These are the basic steps needed to install Windows 10 for an EFI boot, when the Boot Camp Assistant will not create the necessary installation partitions and/or the Windows installer will not allow you to select the desired installation partition.
I have made the following assumptions.
The Windows specifications are given below.
- Use the Boot Camp Assistant to download the Window Support Software. Look for the "Action" pulldown on the Boot Camp Assistant menu bar. On my Mac, these files were downloaded to the
~/WindowsSupportdirectory. - Create empty space on a drive. This space needs to be outside any APFS or Core Storage containers. If you want to use an entire drive, you can skip this step.
At the end of this free space, allocate about 10 GB for the installation files, followed by 600 MB of space for the Microsoft Windows Recovery Environment (WRE). I usually use the
diskutilcommand to do this. Other combinations of commands or third party tools can also be employed. The UUID for 10 GB partition should beEBD0A0A2-B9E5-4433-87C0-68B6B72699C7. The UUID for the 600 MB partition should beDE94BBA4-06D1-4D40-A16A-BFD50179D6AC.If you want to use the entire drive, then the entire drive can be considered free space, so the command below would be sufficient.
diskutil partitiondisk disk1 3 GPT "Free Space" "dummy" R ExFAT "WINSTALL" 10G %DE94BBA4-06D1-4D40-A16A-BFD50179D6AC% %noformat% 800MNote: A
ExFATformat automatically selects a UUID ofEBD0A0A2-B9E5-4433-87C0-68B6B72699C7.- Format the 10 GB partition ExFAT with the label "WINSTALL". If you used the command given in the previous step, so you can skip this step.
- If the 10 GB partition is not mounted, do so now. If you used the command given in step 3, the partition should already be mounted.
Mount the Windows iso file and copy the contents to the "WINSTALL" volume. You will need the use the
cpcommand from a Terminal application window. Below is the exact command I usually use. If necessary, make the appropriate modifications.cp -Rv /volumes/ESD-ISO/ /volumes/WINSTALLNote: This command will take a while to complete. Be patient!
Copy the Windows Support Software to the "WINSTALL" volume. Below is the exact command I usually use. If necessary, make the appropriate modifications.
cp -Rv ~/WindowsSupport/ /volumes/WINSTALLUse the command shown below to delete the
AutoUnattend.xmlfile.mv /volumes/WINSTALL/AutoUnattend.xml /volumes/WINSTALL/NoAutoUnattend.xmlNext, you need to boot from the volume where the Windows installation files reside. Hold down the option key immediately after restarting on your Mac. Release the option when the Startup Manager window appears. Select the icon labeled "EFI boot". Next, select the arrow below the "EFI boot" label.
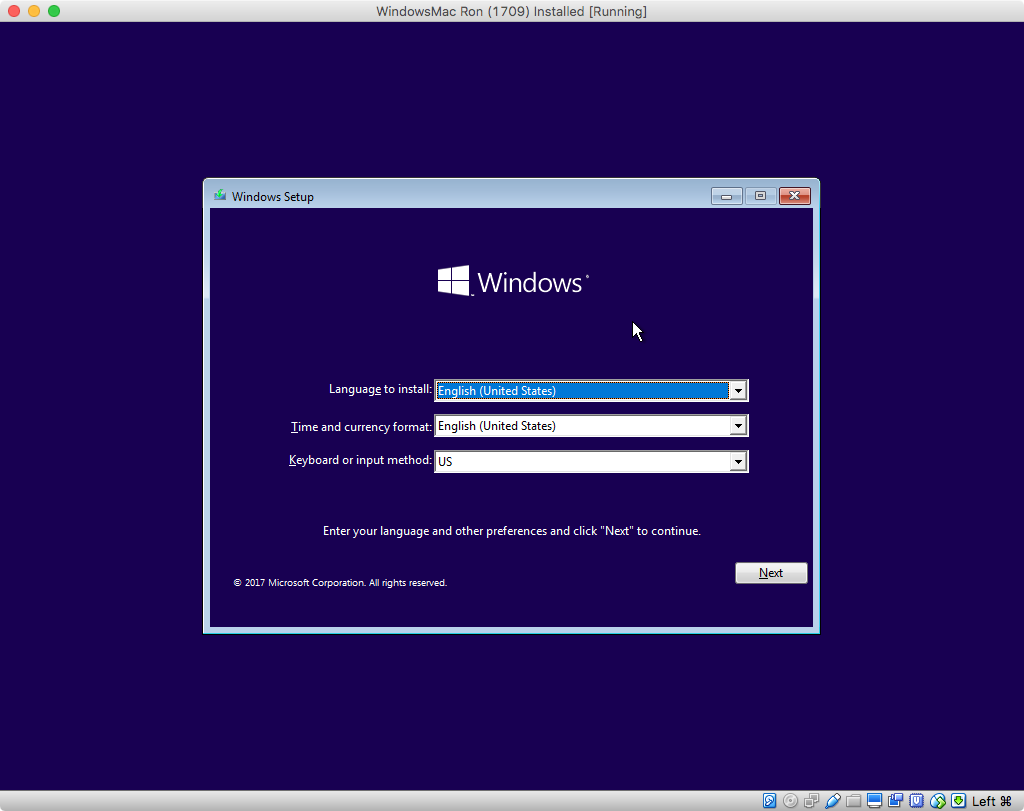
Open a Windows Command Prompt window, by following the procedure outlined in this step. Below is an image of what is initially displayed by the Windows 10 installer. Select "Next".
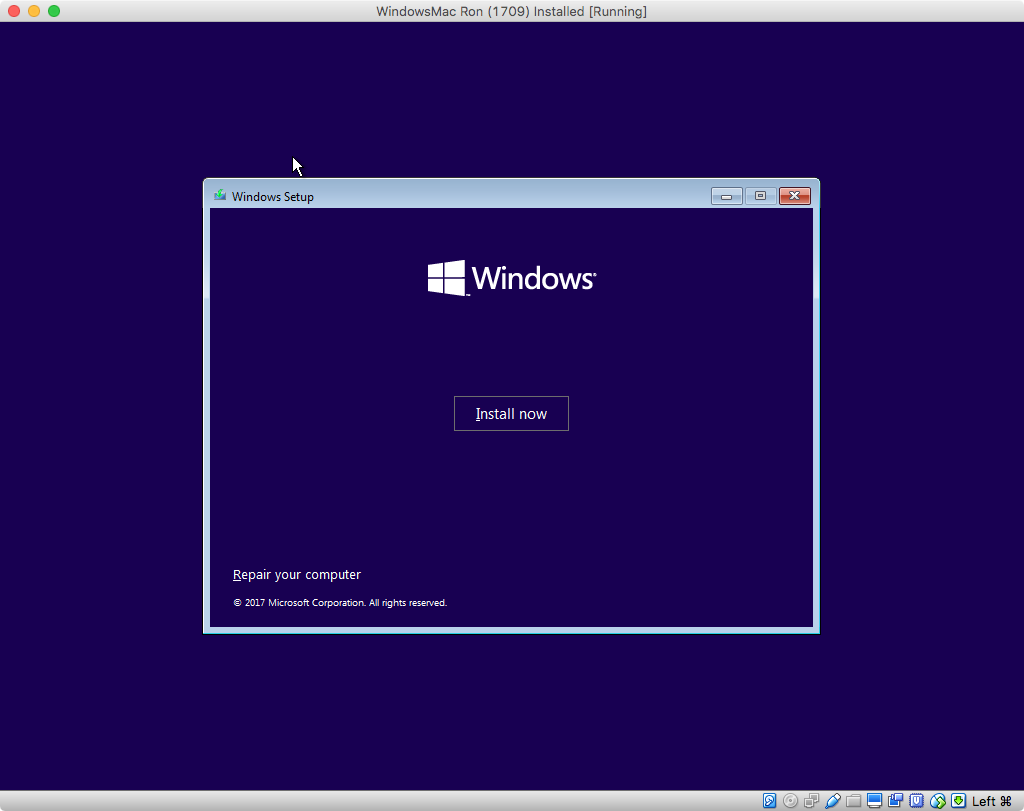
In the image shown below, select "Repair your computer".
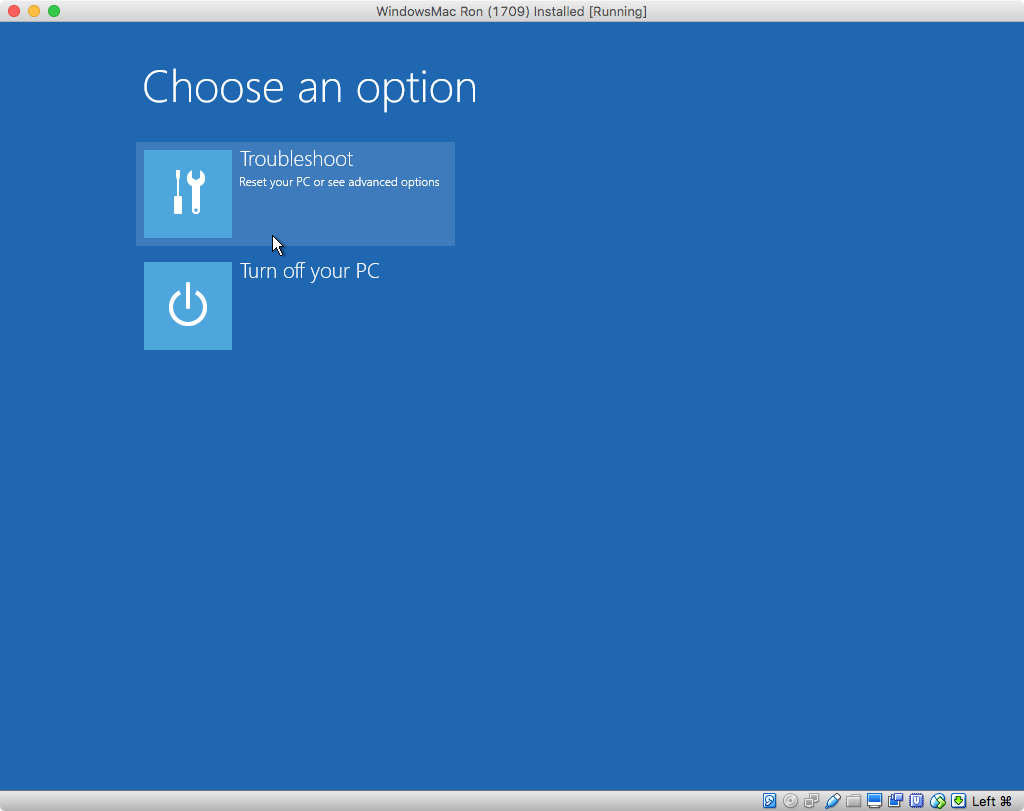
In the image shown below, select "Troubleshoot".
In the image shown below, select "Command Prompt".
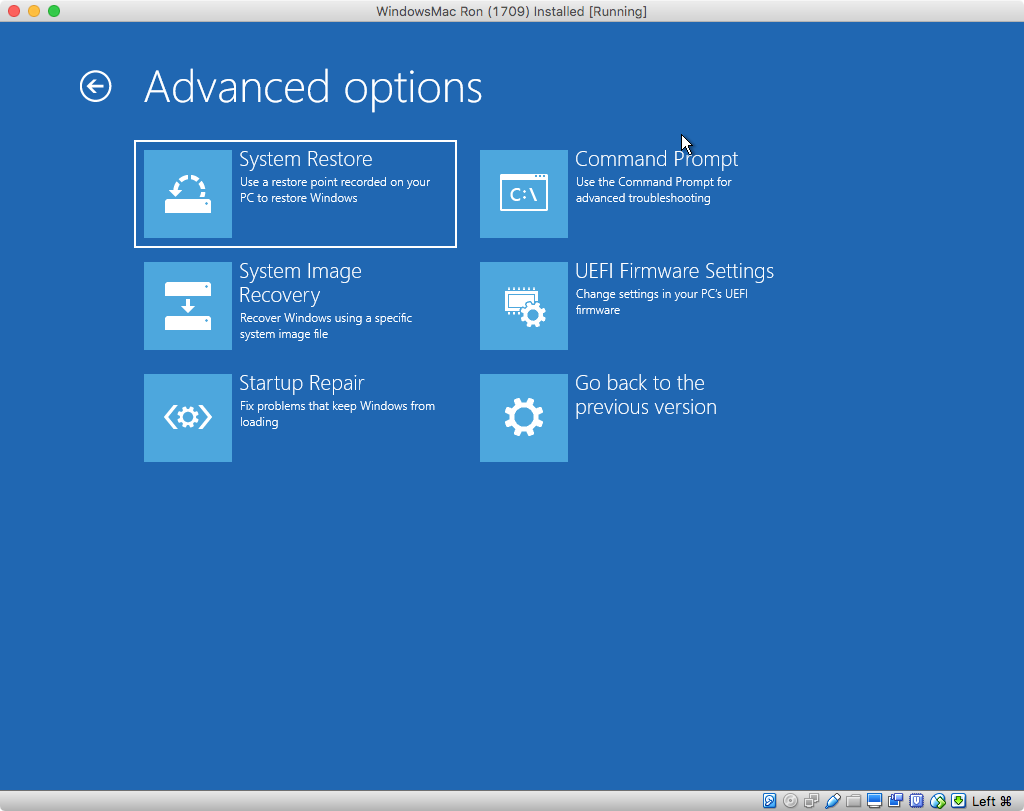
The result should be the image shown below.
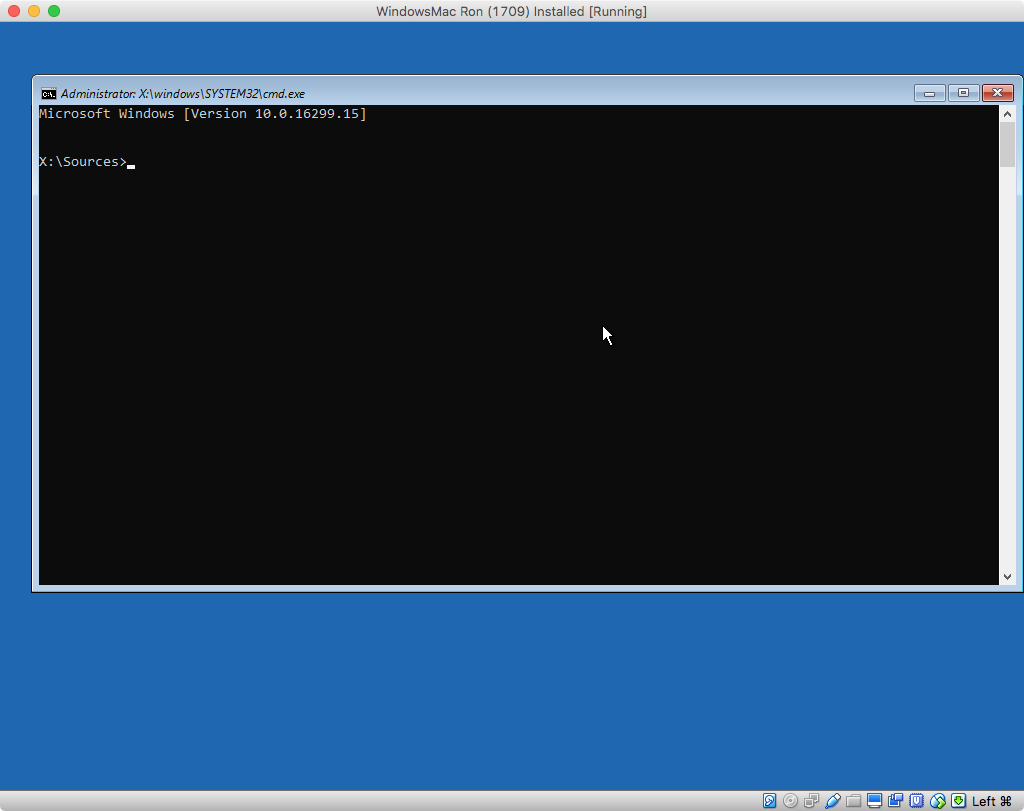
Use the command
diskpartto finish partitioningdisk1. The commands you need to enter are given below.Note: Sometimes it can take a while for the
diskpartcommand to produce the first prompt. Be patient.diskpart list volumeFrom the output of the command
list volume, determine the number for the volume with the label "WINSTALL". In this example, I will assume this number is0. Your number could be different. The next command selects this volume.select volume 0The commands below change the letter for the "WINSTALL" volume to
T:.remove assign letter=tThe next command lists all the partitions in
disk1.list partitionFrom the output of the command
list partition, determine the number of the parition with the type "System". In this example, I will assume this number is1. Your number could be different. Also, determine the number of the parition with the type "Recovery". In this example, I will assume this number is3. Again, your number could be different. The commands below change the drive letter for the "System" partition toS:.select partition 1 assign letter=sThe next commands effect the "Recovery" partition. The proper attributes are set. Next, the partition is formatted NTFS and given the label "Recovery".
select  partition  3
gpt  attributes=0x8000000000000001
format  fs=ntfs  label="Recovery"  quick
The command given below creates the tiny 16 MB Microsoft Reserved partition.
create partition msr size=16Finally, the commands below create the partition for the Windows operating system. This partition is allocated all remaining contiguous free space. The partition is formatted NTFS, given the label "BOOTCAMP" and assigned the drive letter
W:.create partition primary format fs=ntfs label="BOOTCAMP" quick assign letter=wThe command below quits the command
diskpart.exitCopy the Windows files to the Windows partition. First, enter the commands given below to determine name of the file containing the Windows files. I will assume the displayed file name is
install.esd.cd /d T:\ dir /s /b install.wim install.esdIf you get the file
install.wim, make the appropriate substitution when entering the commands given below. Next, enter the following command to determine the index of the Windows image you wish to install.dism /Get-ImageInfo /ImageFile:T:\sources\install.esdFor my
install.esdfile, the index shown for the nameWindows 10 Prowas8. I will use this value in the command shown below. This command will copy the Windows files to the "BOOTCAMP" volume.dism /Apply-Image /ImageFile:T:\sources\install.esd /index:8 /ApplyDir:W:\ /CheckIntegrityNote: When entering the above command, the parameter
/name:"Windows 10 Pro"could have been substituted for/index:8.Add the Apple supplied drivers to the drivers store. This can be accomplished by entering the command shown below.
dism /Image:W:\ /Add-Driver /Driver:T:\$WinPEDriver$ /Recurse /ForceUnsignedNote: If any drivers are ineligible, you may see error messages. This is normal, so such error messages can be ignored.
Write the boot files to the EFI partition. The command to use is given below.
bcdboot w:\windows /s s:Disable the ability to boot from the "WINSTALL" volume. This can be accomplished by entering the command shown below. This will rename the folder containing the boot files.
rename t:\efi noefiEnter the command shown below to quit the Command Prompt Window.
exitThis should result in an image similar to what is displayed below. Select "Turn off your PC", then wait for the Mac to completely shut down.

You need to finish the initialization of Windows 10. Hold down the option key immediately after turning on your Mac. Release the option when the Startup Manager window appears. Select the icon labeled "EFI boot". Next, hold down the control key while choosing the circular arrow below the "EFI boot" label.
Proceed until you reach the screen where you are prompted for your region. For the 1709 version (OS build 16299.15) of Windows 10, your the screen will appear as shown below.

For other versions of Windows 10, the screen could appear different. As an example, the screen, for the 1507 version (OS build 10240) of Windows 10, would appear as shown below.

Note: At this point, prohibiting your Mac access to the internet is generally a good idea. For example, unplug any ethernet cables or disable Wi-Fi access that does not require encryption.
Next, press the control+shift+F3 keys to restart Windows 10 in Audit mode.
When desktop shown below appears, use the Windows File Explorer to open the Windows Support Software application named "Setup". This application can be found in the "BootCamp" folder on the "WINSTALL" drive. After the installer application completes, allow the computer to restart.

Next, boot to the Windows Recovery Environment. Basically, hold down the shift key while selecting to restart Windows.
Navigate to a Windows Command Prompt by following the instructions given below.
In the image shown below, select "Troubleshoot".

In the image shown below, select "Advanced options"

In the image shown below, select "Command Prompt".
After a short delay, you should get an image similar to what is shown below. Choose the Administrator account to continue.

Next, you should get an image similar to what is shown below. Select "Continue".

The result should be the image shown below.
Delete the "WINSTALL" partition and extend the "BOOTCAMP" volume to reclaim the free space. The procedure is given below.
Enter the following pair of commands to start
diskpartand list the current volumes.diskpart list volumeFrom the output of the command
list volume, determine the number for the volume with the label "WINSTALL". In this example, I will assume this number is1. Your number could be different. Also, determine the number for the volume with the label "BOOTCAMP". In this example, I will assume this number is0. Again, your number could be different.The next pair of commands selects the "WINSTALL" volume and then deletes the corresponding partition.
select  volume  1
delete  partition
The next pair of commands selects the "BOOTCAMP" volume and then extends the corresponding partition to consume the deleted space.
select  volume  0
extend
The next pair of commands quits
dispartand closes the window.exit exitIn the image shown below, select "Continue" to boot back to Windows 10.
You will return to the Administrator's desktop displaying the "System Preparation Tool" window. In this window, select "Shutdown" under the "Shutdown options", as shown below.
Note: Your screen may also include a window labeled "Boot Camp", which can be ignored.

Next, select "OK" to shutdown the Mac. At this point, you have completed the installation of Windows 10.
Note: If you prohibited your Mac access to the internet in an earlier step, you may now want to allow access before turning your Mac back on. In other words, plug in the ethernet cable or turn the Wi-Fi back on.
Next time you turn on your Mac, Windows will start in the "Out of the Box Experience" mode. This is basically the way a newly purchased PC starts up, when Windows 10 is already installed.
Note: When asked, be sure to select an Apple keyboard.