Over the last three years we, the Team RevvoX (formed in Nov. 2019) came up with a lot of information regarding all the possibilities that can be done with Tonieboxes besides the origin features.
We achieved to bring, own content, own NFC tags, customization and even some hardware mods to the Toniebox. In addition we have supported a lot of repairs for otherwise ‚dead‘ boxes with our knowledge of the different revisions of the PCB to check or exchange the right components (we even have a complete reverse engineered hardware layout within our wiki).
Within this Blog Post I would like to give a short introduction to all new community members that are interested in tinkering with the new toy that their children got for Christmas or any other occasion.
You can find all members of the Team RevvoX within our Telegram Group. We are looking forward to see you there and are more than willing to answer your questions if there is anything left open.
What can be done without any FW or HW modification?
There are several different levels how to modify the Toniebox and the user’s experience without changing the hardware or the firmware.
Custom Content on the Toniebox
We as Team RevvoX introduced a software called TeddyBench, which is a GUI based Software for Windows that lets you add your own audio content to any Toniebox independently from the Tonie Cloud. Therefore, you can grab some mp3 files and encode them as TAF (Tonie Audio File) and implement them on the build-in microSD Card of the Toniebox.
This can be done just by getting access to the microSD card and placing this into any microSD card reader on the PC. TeddyBench will recognize all Contents that are already stored / downloaded to the box. After encoding some own audio content you can place the card back into the Toniebox and it will work.
No firmware modification nor other hardware hacks needed.
Custom NFC tags
To let the Toniebox play your own content, you need to have some way to let the box know what it should play. Therefore we figured out, what kind of NFC Chip is used within the figurines and how it is linked to the box and its content. If you like to understand how this works, please feel free to read one of my older blogs dedicated to the internals (click here).
By using custom tags you can let your box play your custom content.
TeddyBench helps you to get the link between the custom tag and your custom audio content set. For this you need the 8 Byte long UID of your custom tags.
There are several ways to read the UID of the custom tags, such as using smartphone apps (iOS: NFC Tools, NXP Tag Info; Android: NXP Tag Info), hardware tools like the Proxmark3 or the Flipper zero, or an Arduino with a compatibel NFC reader (e.g. ESP8266 with a PN5180).
IMPORTANT: Once the tag is placed on the Toniebox you will NOT be able to read the UID of the custom tags because the Toniebox will enable the „privacy mode“ on this tag. What this is and how to get out of this mode, you can read in the section „Important things to know“ further down this Blog post.
The solution to this is FIRST read ALL UIDs from your custom tag, write them down and then start using them with the Toniebox.
Where can I get the right custom tags that will work with my Toniebox?
[RFIDfriend] is the answer and the recommend source by Team RevvoX! He spent a lot of time and effort figuring out where to get the right tags and was able to source some of these. By going back and forth with some Chinese RFID label manufactures and buying a lot of wrong NFC tags, he was eventually able to get his hands on the right ones. They come in form of round sticky labels.
RFIDfriend has some of these tags left and is more than willing to hand these over to some tinkerers. You can find his page at RFIDfriend.com, or can contact him directly via Telegram Chat or via eMail (he sends these international as well). The best way is to contact him via eMail.
Be aware that there are some Chinese fakes going around as well! These tend to fail after minimal use. But you can be assured that RFIDfriend is only handling tags with the original NXP chip build in.
Play content with custom tags
The way the Toniebox works is that as soon as a figurine is placed on top of the box, it checks whether the related content is already on the internal microSD card and starts to play it back, or it starts downloading the corresponding audio content from the Tonie Cloud and saves this on the microSD card while it starts playing it back.
To let the Toniebox play your custom content, you would need to place your encoded audio file in the same directory and have it linked to one of your custom tags.
TeddyBench can not only help you to encode your own content and place this to the right path on the SD card, it can be used to manage the custom content and the links to your custom tags as well.
Within TeddyBench you just do a simple double click on the content and it will open a popup window. There you can edit the UID to the UID of your custom tag. That’s all it takes to play your content that is on your Toniebox.
Downside of going the custom content / custom NFC tag way
There is just one downside to this. You have to keep the box in Offline Mode, or just cut off the internet connection for your Toniebox via your internet router settings.
Every time the box starts up it is verifying the whole content that is stored on the internal microSD card with the Tonie Cloud. This is eventually leading to the deletion of content that is not linked to UIDs known to the Tonie Cloud when the according custom tag is placed on top of the box (while this is online). Even the unplayed custom content is changed so that the resume feature will not work for it anymore, even after switching back to Offline Mode.
Why exactly this takes place and how you can get away with the Offline Mode and live with this while still using original Tonie figurines, you can find in the section further down in this article about the „important things to know“.
What can be done with Bootloader / FW modification?
The PCB design of the Toniebox has a Debug Connector present. This arouses even more curiosity about going further down that rabbit hole. In this section I will just briefly explain what can be done so far.
If you are interested in how to make a full dump of the flash, take a look into my older blog post where I explain in detail how to do this.
Information about how to install the custom bootloader, please take a look into our wiki.
IMPORTANT: As of now only the Toniebox V1 and V2 are able to get the Bootloader / FW mod. The V3 uses another microcontroller and is not yet ready for this. We are working hard on this…
Custom Bootloader / HackieboxNG SD bootloader
The Bootloader is the first thing that gets started when the microcontroller gets powered up. It takes care of preparing some basic stuff AND will eventually load the Toniebox firmware.
The HackieboxNG SD bootloader enables two main features to the user:
- switch between different firmwares (up to nine OFWs and CFWs)
- patching the original firmware on startup
Switching between different firmwares
By pressing the ear buttons in a certain order, the box will prompt you with a different blinking sequence at the center light, signaling that you are in the FW switching mode. Here you can switch between nine firmware slots. These can be either different versions of the original firmware or could be custom firmware (see next section).
Patching the original firmware on startup
With patches for the original firmware you can add certain features to the normal use of your Toniebox. To name a few:
- disable privacy mode
the privacy mode for the figurines and custom tags will remain disabled after removing them from the box - disrupt the connection to the Tonie Cloud
- use of alternative NFC tags
enables the use of other NFC standards in addition to the one demanded by the Toniebox - disable hidden mode
blocks the verification at the start of the content directory with the cloud. This way, the custom content will not get the „hidden flag“ (see section „important to know“) - …
More details and How Tos can be found in our wiki.
Custom Firmware (CFW)
The custom firmware (CFW) by Team RevvoX is as of now just a proof of concept and not able to serve as a daily use firmware for the Toniebox.
You can play single WAV files and see differnt hardware status within a webpage that is provided. Even a file transfer is possible (that is far too slow to use it as a content handler).
If my words did not hold your interest and you like to support further development to a useable solution that is capable to play TAFs, please visit our wiki for more information.
What hardware hacks can be done?
relocation of microSD card reader
Because managing the content on the microSD card with TeddyBench requires regular access to the microSD card, and a complete teardown of the Toniebox would take some time (although we did some speedruns to proof how fast we are), we came up with a simple hardware modification that lets you relocate the microSD card holder to the bottom of the Toniebox just behind the lid.
For this mod you would need a microSD card extension which is at least 25cm long (longer than that is fine, there is enough space within the Toniebox to place longer cables).
Here are some Amazon Links to the needed extension. (some of them are now and then not available. Thats why I pasted some more links).
- Amazon Link – 25cm
- Amazon Link – 48cm (choose the TF – TF option)
- Amazon Link – 48cm
- Amazon Link – 48cm
- Amazon Link – 60cm
- Amazon Link – 60cm
If you like to procure a ready modified cable where the housing and the resistor is removed, please take a look at this offer.
Here are some Pics that show how the mod is done. A detailed write up is in the making.
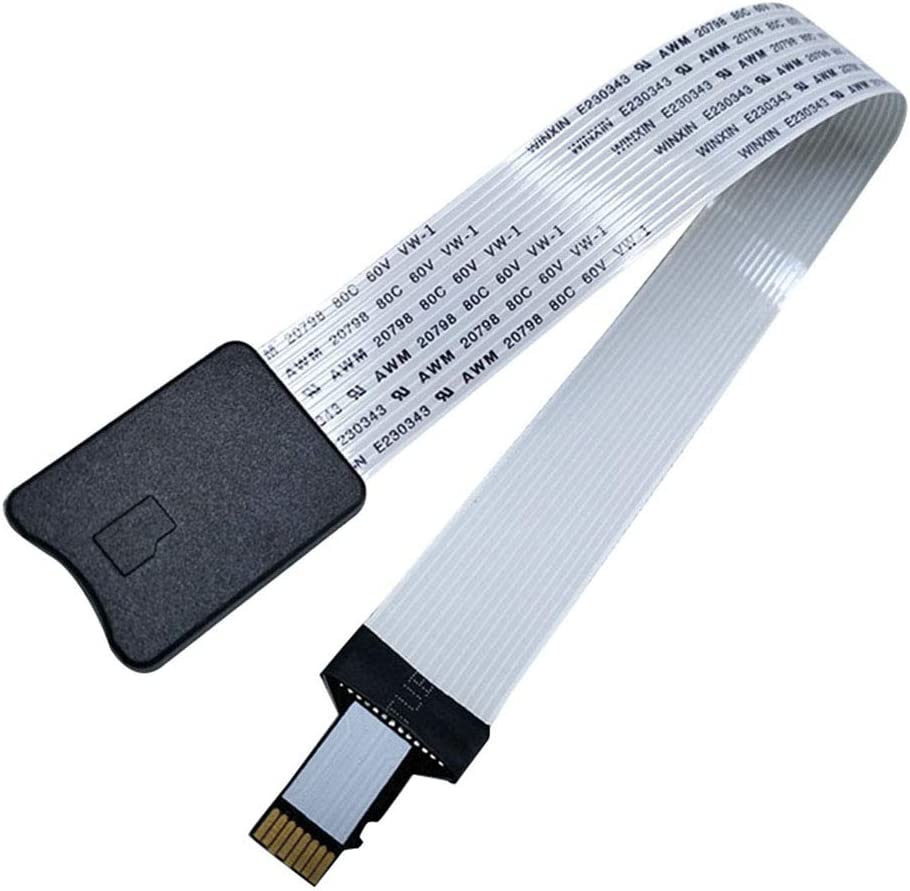
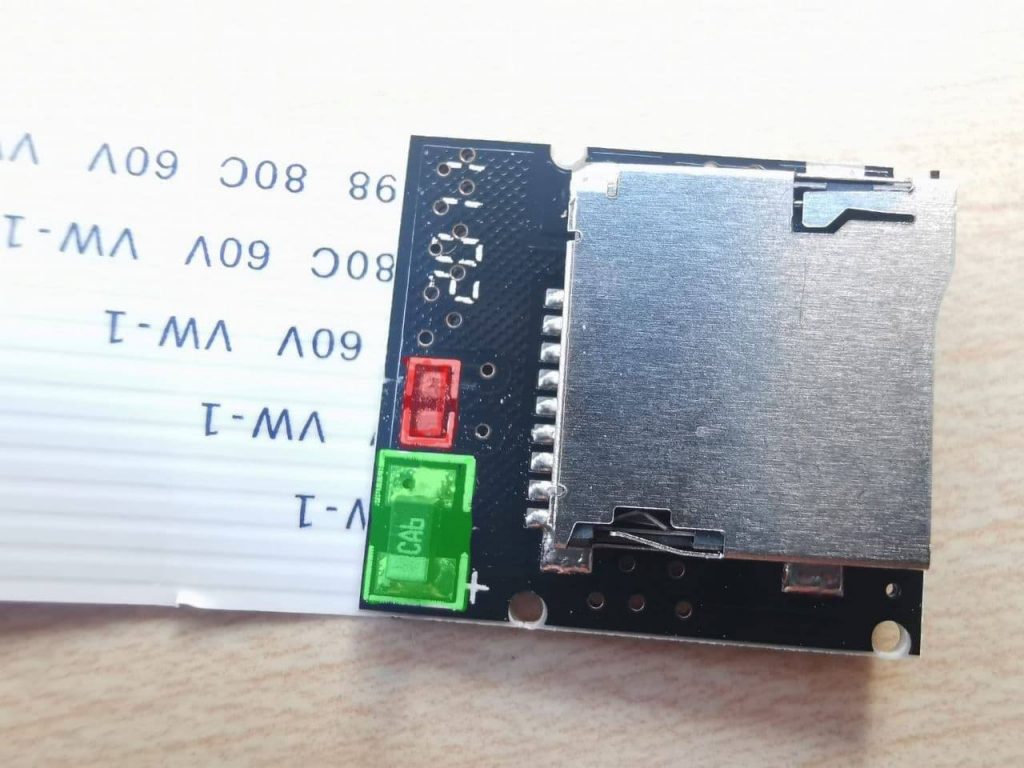
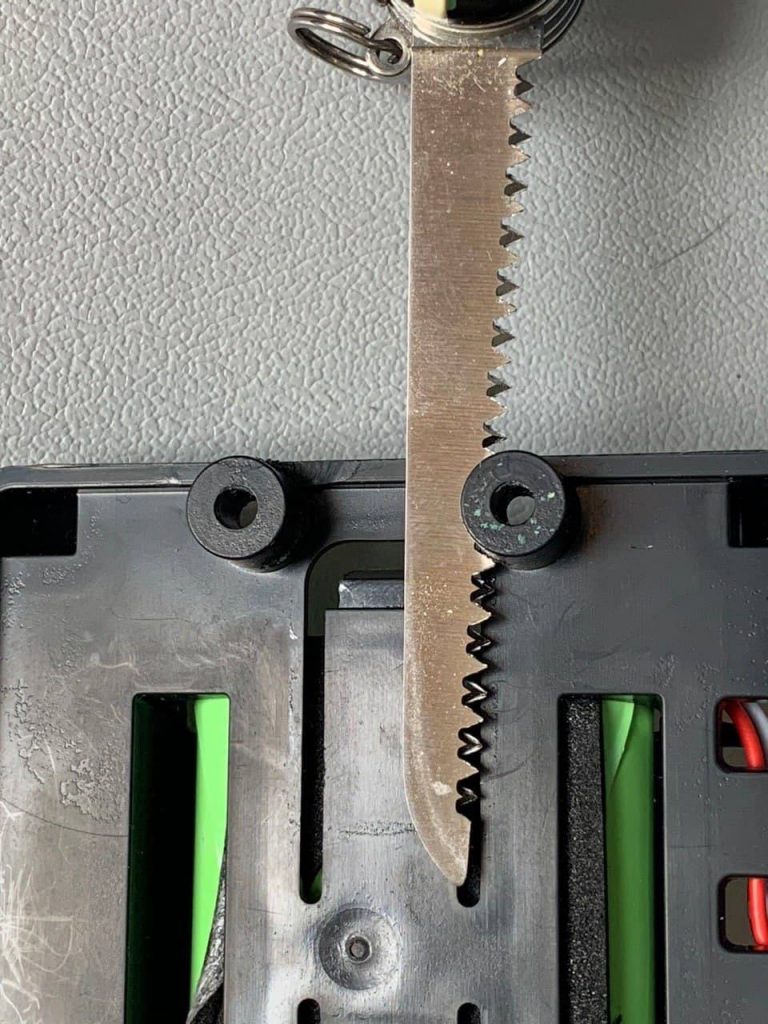
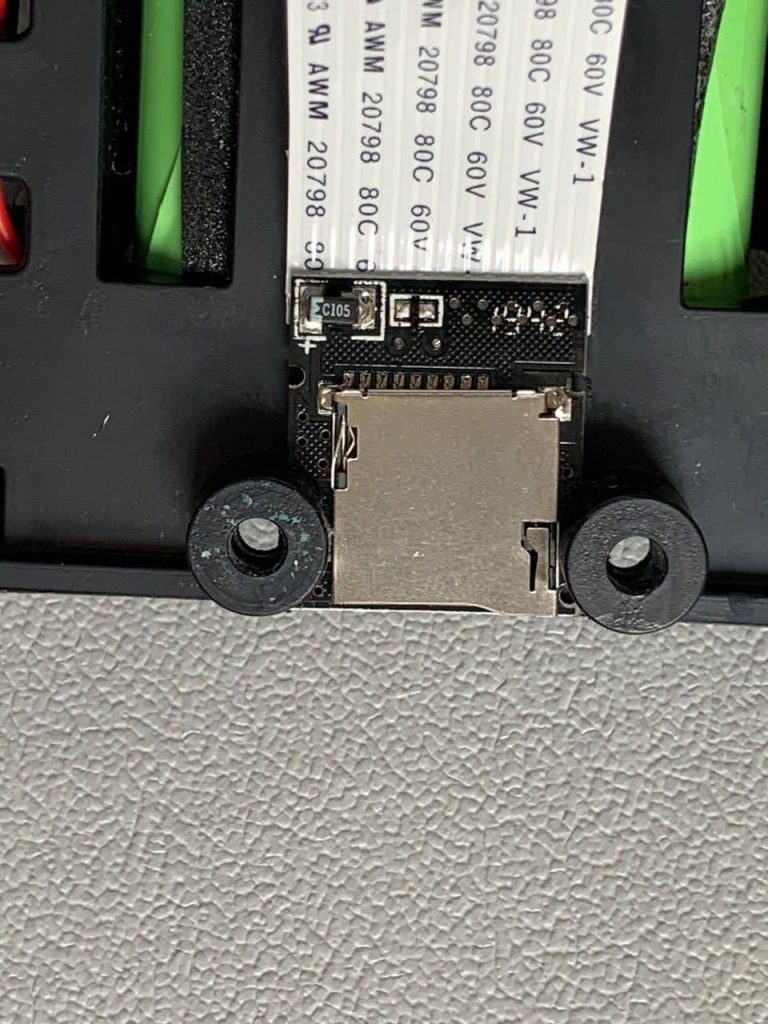
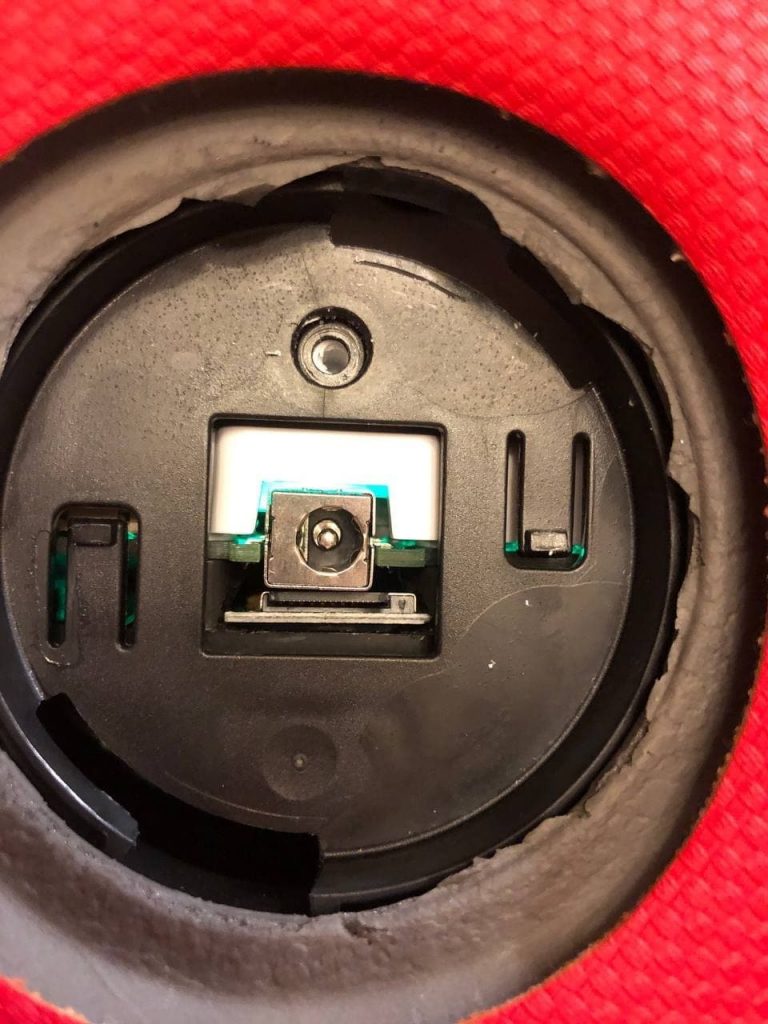
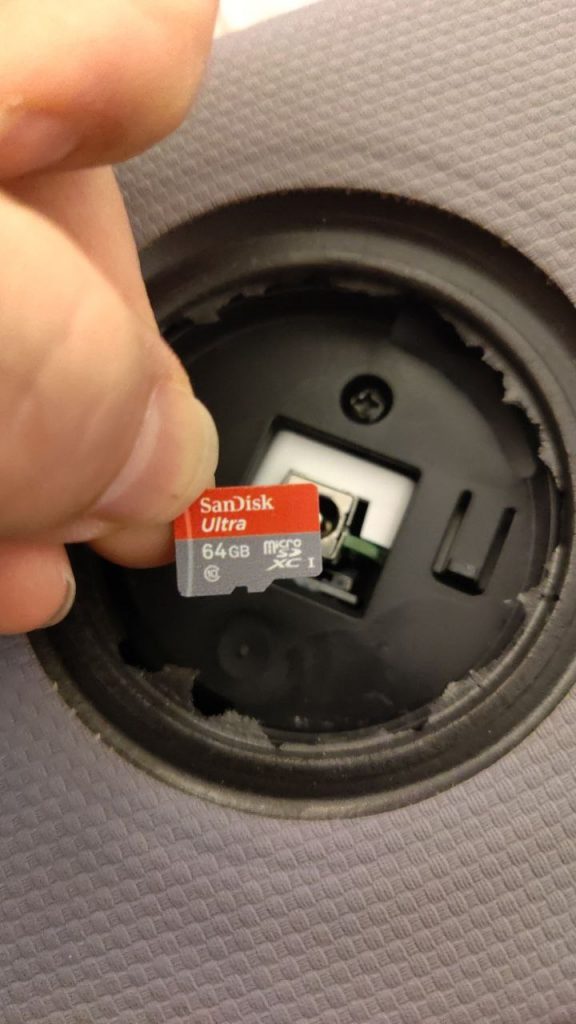
Quick HowTo: remove black plastic housing of extension; remove red marked resistor from extension PCB (e.g. with plier); make two small cut outs in the screw studs; slide extension PCW in between the studs; use some hot glue to fix the PCB; take care that when the microSD card is inserted the upper side of the card is slightly higher than the surrounding surface (this way you can press it and it will come up to grab it with your fingers).
The red marked resistor needs to be removed. Otherwise the Toniebox will not be able to read the microSD card!
Inserting the microSD card extension into the microSD card holder on the PCB takes a bit of gentle force. There is one larger (silver cylindrical) part right next to the holder. But if you give a bit pressure on the whole package you will be able to close the lid of the microSD card holder.
Build your own figurines and tags
The original figurines are definetly an outstanding feature of the Toniebox. My kids love to play with these even without the Toniebox. But sometimes they are very bulky as well. Especially while traveling. Therefore I came up with the „Travel Tonie“. It is a coin shaped custom tag that includes a describing picture, a magnet and a NFC tag from RFIDfriend (the round sticker). This way we are able to bring much more Storys with us on our journeys.
Here are some Pics that show how these tags are build up. A detailed write up is in the making.
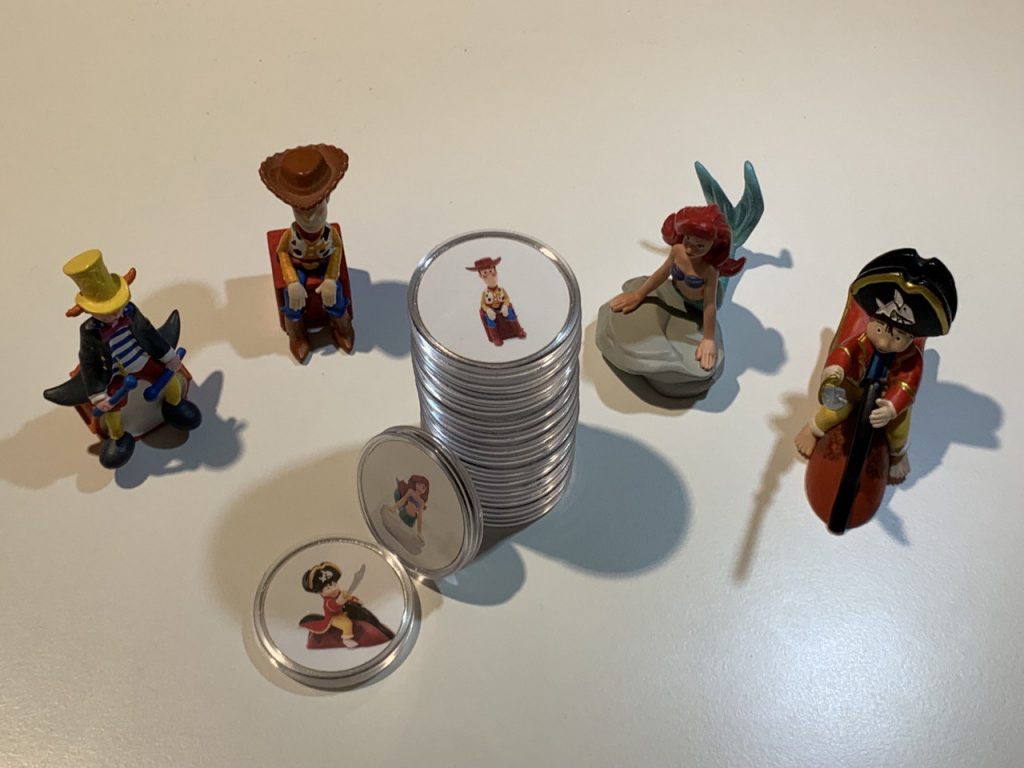
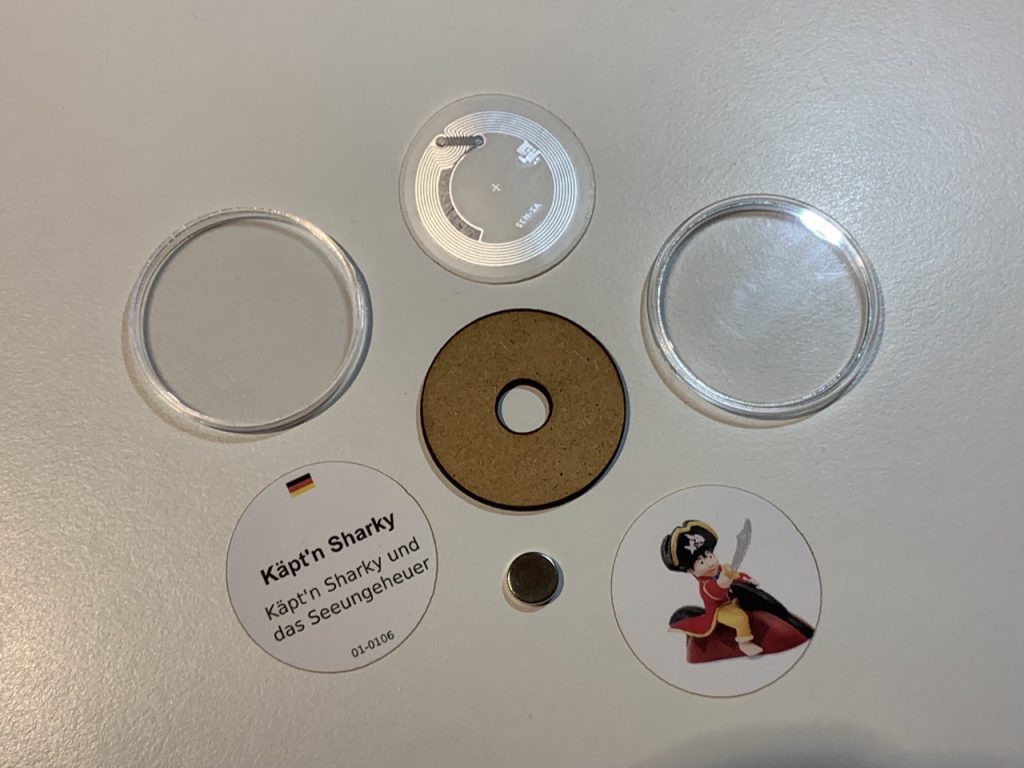
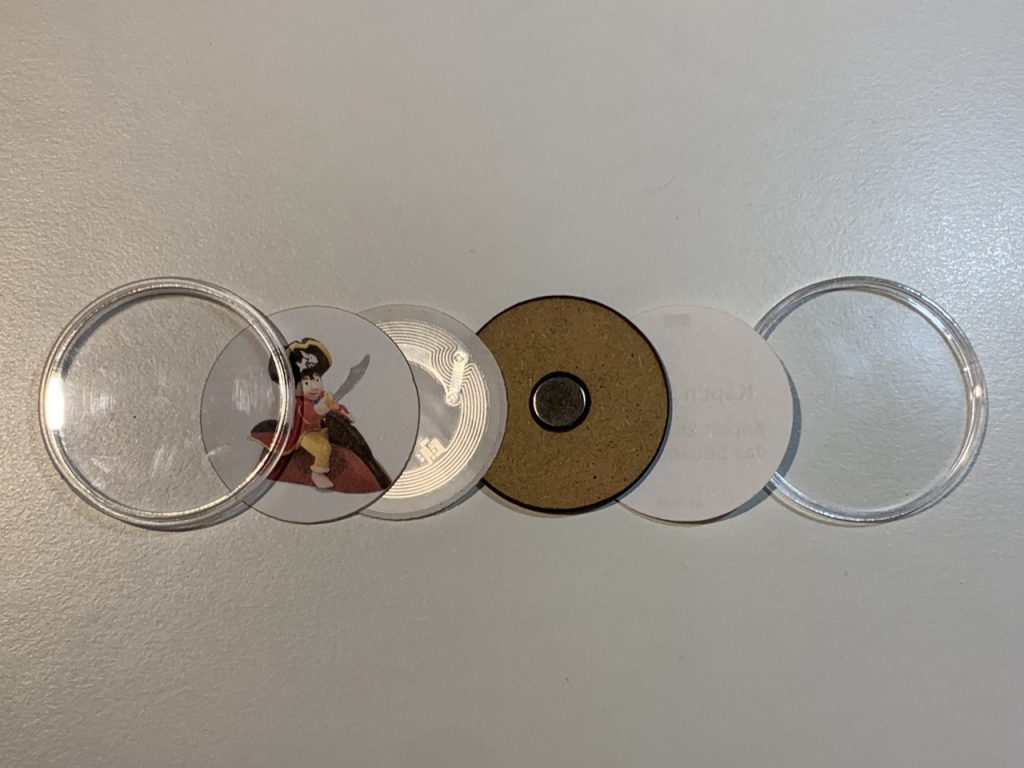
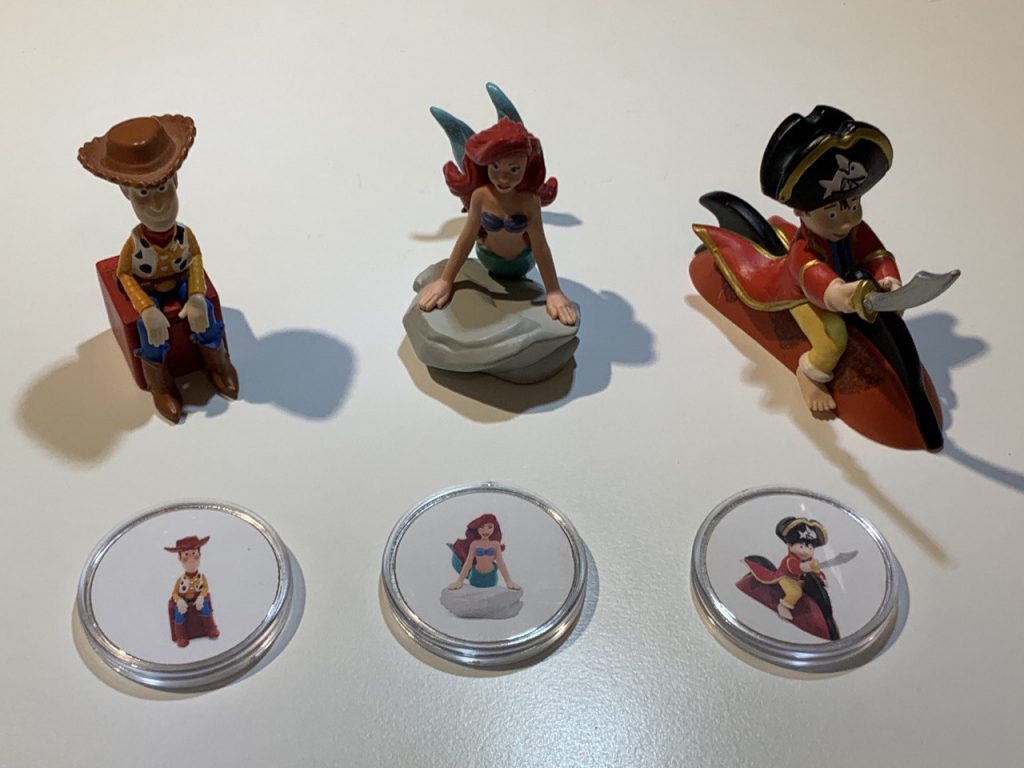
I used the following coin cases and magnets:
- Amazon Link – Coin Case (40 mm) 100 pcs
- Amazon Link – Coin Case (40 mm) 40 pcs
- Amazon Link – magnets (10 x 3 mm)
- custom tags from RFIDfriend
What else is possible?
Support of Proxmark3
The Proxmark3 is a powerfull NFC / RFID / hacking device. The problem we faced was the privacy mode. Once a NFC tag was placed on the Toniebox, the privacy mode feature of the NFC tag was enabled, It was not able to read tags where the „Privacy Mode“ was enabled.
Back when we started a modified firmware for the Proxmark3 was needed, but now the needed function found their way into the regular proxmark3 firmware to fullfill the following tasks:
- disable privacy mode of NFC tags (with known passwords)
- communicate with TeddyBench
- emulate NFC tags for the Toniebox
Use TeddyBench with the support of Proxmark3
TeddyBench can change the linked UID of the audio content on the microSD card. This can be done by double clicking on the audio content to be changed. A window will open and present the actual linked UID which can be edited. This can be either done by manually enter the new UID via the keyboard (the UID must be read prior to this with your smartphone app), or you could just place the tag onto the Proxmark3, which will disable the privacy mode and enter the UID for you.
In addition it will show you the linked content within the Content frame of TeddyBench. If you place any used tag onto the Proxmark3, it will directly highlight the linked content so that you know immediately what this tag is connected to at the moment.
Here are some links to get your hands on the Proxmark3
- Amazon link
- Amazon link
- Amazon link
- Amazon link
- Amazon link
- Amazon link
- Amazon link
- Amazon link
- Amazon link
Emulating NFC tags using Proxmark3
The NFC tags used for the Toniebox store in total 40 Bytes of data. 8 Byte are used for the UID and 32 Bytes are stored within the memory blocks (8 Blocks á 4 Bytes).
With the Dump feature build into TeddyBench you can use the Proxmark3 to read the complete data from tags. This data can be used to emulate a NFC tag. When the Proxmark3 is placed on top of the Toniebox and you start the emulation feature with the prior read 40 Bytes of data, the Proxmark3 starts emulating the given information and the Toniebox starts playing the connected audio accordingly.
Emulating Tonies with Flipper zero
For the Flipper Zero our Team Member g3gg0 came up with an addition to enable it to read iso15693 tags although the used internals are not capable of doing so. He bitbanged the needed protocol into the tool and added the feature of dumping the correct NFC tags. An emulation feature was added as well, where the prior dumped information could be used to play these back and the Flipper zero could be placed on top of the Toniebox which will start working the same way as an original NXP NFC tag would do.
You will find more information on g3gg0s blog.
Important things to know
Some hints on common issues and failiures that can be done:
Offline Mode
If you have custom content on your microSD card, or you have linked any other content to custom tags, you should avoid going online with your box. Otherwise two things will happen to your custom stuff. For all custom stuff the resume feature will get lost and if you place your custom tag on the box while it is online, it will delete this content as well.
To avoid this you could either switch to the Offline Mode (holding both ears until a sound is played, press one of both ears again until another sound is played), or you could take some actions like blocking the Toniebox within your router. Linking the Box to a Wifi that is only active when needed, works as well.
I for myself use a second microSD card to download new content with original Tonie figurines and copy the new files to another microSD card that I only use in Offline Mode. This way I can have fun of both worlds.
BUT BE AWARE: The Box will leave the Offline Mode as soon as it gets disconnected from the battery, or the battery runs flat.
Resume feature / Live mode / hidden file attribute
If your box goes Online while having your custom stuff on it, the Toniebox will add the „hidden“ file attribute to the files that are altered / not known to the Tonie Cloud. Although you did not place the custom tag on the Toniebox (this would let the box delete this specific content) before you went back Offline, it enables the „LIVE Mode“ (just ment for creative tonies). This means that the audio will ALWAYS play from the very beginning and the resume feature will not work.
You will get this feature back by removing the „hidden file attribute“ from all custom content files. The better way is to keep the box from going online. Or take care that the microSD card with the custom content is not going online and you always use a different microSD card to go online and download new content (see Offline Mode section for more information).
Privacy Mode – What is it and how do I get rid of it?
The NFC chips that are required by the Toniebox and are used within the within the Tonie figurine as well are keeping their information as a secret. They are locked into a so called „privacy mode“ that can only be disabled by using the password set by boxine.
The custom tags you can buy from RFIDfriend are send to you with a disabled privacy mode. That means you can read the UID with you smartphone and tools like „NFC Manager“ or „NXP Tag Info“. But as soon as these were placed on the Toniebox, these will be locked as well.
To disable the privacy mode you could either use a Proxmark3 or use the „knock method“.
The knock methode is called so, because you „knock“ (or tab) the tag very quickly onto the reader surface of the Toniebox and remove it immediately. This way the box will disable the privacy mode and tries to read the content of the chip. The quick remove of the tag from the reader prevents the box to enable the privacy mode again.
If it does not work for you, you might be toooo slow. Here is a short video.
Toniebox hardware differences – V1, V2, V3
The first Toniebox was released at the second half of 2016. Since then two major PCB layout changes were released.
The V1 and V2 share basically the same architecture around the TI CC3200 microcontroller. The V2 was released during the Chip supply shortage and the US release of the Toniebox. Thats why we believe they just made some adjustments to fit different electronic components because other might not be available at that point of time, or Boxine had to do some corrections for the US release.
Because the TI CC3200 was deprecated a while ago they had to come up with the V3 wich implements the TI CC3235. The V3 Toniebox was released at the beginning of 2022.
Besides of the PCB Layout and microcontroller changes the overall look and user experience did not change in comparison of the three versions.
The downside (as of now) is, that our custom Bootloader and CFW does not work yet with the V3. But we are working hard on this issue.
Final thoughts
This is just a short introduction into hacking of the Toniebox. We gained a lot more knowledge about how the Toniebox works and what are the detailed processes behind the scenes…
This tutorial is purely focused on bringing own or custom content to the Toniebox. It is not ment to do any harm to the Tonies eco system nor to Tonies itself. The Team RevvoX and the RevvoX community are probabvly the biggest Tonies enthusiasts and Tonies aficionados that are just interested in bringing new features into the Tonies world.
If you think I should add more information about certain stuff, please drop me a line at gambrius@gmail.com or leave a comment.