Everything here is old!
[FlimFlam69's Wii U 5.5.1 Kernel Exploit Guide] - Last updated, 10/27/2016
LATEST FIRMWARE: 5.5.1
LATEST EXPLOITABLE FIRMWARE: 5.5.1
RECOMMENDED FIRMWARE: 5.5.1
[Attention]
I know it's archived, well have it fixed soon.
/u/DanTheMan827 has updated uTikDownloadHelper, effectively omitting 1 phase from the Brazilian Title Install Method! The process is now even easier than before.
Guides on injecting and dumping saves using Saviine are now available. If your looking to bring your Loadiine saves over to titles you've installed using the Brazilian Title Install Method, this is for you.
Looking to hack your vWii? I used this guide a few years ago. Then this new method came out a few days ago.
Your Wii U is in no danger if you decide to run an exploit. This is a very safe procedure, and a relatively simple one at that. Were not soldering anything, or preforming kind of hardware mods; all you need is your computer, the internet (with a wireless router), a Wii U, and an SD card.
If you're new, I would suggest taking a look at some things you can do to prevent your Wii U from getting an update from Nintendo. Updating your console will most likely prevent you from running any kind of exploit for a long time (and it will most likely come as an automatic download if your Wii U is always on standby and online). Look at the first four sections of this guide to determine what's best for you. After that, move onto prepping the SD card and try running the exploit the easy way first.
If you have any other questions, check the FAQ first before you ask! I will try my best to answer any question you have. :)
[TABLE OF CONTENTS]
[Dual hax (Tubehax + Chncdcksn hax)] [KE01]
Tubehax & chncdcksn hax are two different DNS servers that are used for the purpose of preventing updates through Nintendo. Before we do anything, we need to make sure that your Wii U will remain on 5.5.1 - and this is one of the best/ most popular ways of doing so while still being connected online.
This method sets up both 'Tubehax' and 'chncdcksn hax' DNS servers. In the event that Tubehax goes down, the Wii U will automatically use chncdcksn hax instead. (You will not be able to access the eShop through this. If you want eShop access, check out the Various Things section.)
Note: If you still want YouTube access on your Wii U, set Tubehax as your 'Secondary DNS' and chncdcksn hax as your 'Primary DNS'.
Thanks to /u/chncdcksn for the DNS server. The community absolutely appreciates it!
[Router URL Blocking] [KE02]
If your router has the option to block certain URLs from passing through, that's a way better way of keeping your Wii U safe and connected. After setting this up, I don't think you will be able to access the eShop, but you should be able to play games online just fine. (If you still want eShop access, check out the Various Things section.) I can't exactly write a guide URL router blocking because everyone's router is different, and more specifically, my router doesn't have that specific function. Here are the URLs to block if you can:
Note: Router URL Blocking will block all things Nintendo. This means that if you have a 3DS of any kind, it will not be able to preform updates either. Other Wii U consoles connected to that router won't be able to update as well.
[Disable Automatic Software Downloads] [KE03]
As an added precaution, you can also do as the header says: disable automatic software downloads. If you go into internet settings, the option to enable/ disable is below the 'View Mac Address' button. (Thanks /u/KingGhidorah01)
[Kernel Exploit Prep Work: Setting up Your SD Card] [KE04]
Step 1) Format your SD card to FAT32. If the linked method doesn't work for your OS (or if FAT32 isn't listed as an option), you need additional software. /u/LightPrism suggests fat32format.
Note: If you can, use 64kb clusters. If that ends up not working, try 32kb clusters. I've gotten them both working on Wii U, but people seem to be saying they have better luck with 64kb clusters.
Note 2: If you have to name your SD card, do not name it "wiiu". It's been reported that this will not work for whatever reason. (Thanks /u/unfortunate_timing, I should've added this tidbit a while ago!)
Step 2) Download my Starter Pack
Step 3) Extract the contents of the .zip file to the root of your SD Card (It only should be a wiiu folder).
Step 4) Games go into the following directory:
[Running the Kernel Exploit: The Easy Way] [KE05]
Step 1) Put the SD card into the SD Card slot in your Wii U
Step 2) Turn on your Wii U, and go to the Web Browser.
Step 3) Go into your internet settings and Reset your Data. (If this isn't your first time running the exploit, you can probably get a way with just Deleting Cookies.)
Step 4) Back out of internet settings and type this into the address bar: http://loadiine.ovh/
Step 5) Ensure that the displayed drop down box is displaying "Homebrew Launcher..." and press the Submit button.
Step 6) Presto! It should have worked, and you should be seeing the Homebrew Launcher menu within seconds. If it freezes on a white screen, then just do a hard reset and go back to Step 2.
I hope this helps! It's a pretty simple process. The exploit isn't 100% stable, so it might fail from time to time.
[Running the Kernel Exploit: The Self-Hosting Way] [KE06]
With this method, you will be self-hosting the Wii U exploit, rather than going to loadiine.ovh every time you want to get into Homebrew Launcher. This is literally using the same payload http:/loadiine.ovh uses to exploit your console online, so you should be getting close to a 100% success rate with this.
I have made a package for everyone to download that includes instructions on how to do everything. I've made it as simple and noob friendly as possible, though the guide assumes you have followed the "Kernel Exploit Prep Work: Setting up Your SD Card" guide from above. You can download the package below.
Note: This is a modified version of Kafluke's all-in-one package from GBATemp. Special thanks to Cybernatus (From GBATemp and loadiine.ovh) for making this payload public.
Download FlimFlam69's All-In-One Self-Hosting Package 117mb v1.1
[Running the Kernel Exploit: Self-Hosting and Taking Your Wii U Offline] [KE07]
With this method, your Wii U will be completely offline and still be able to access the exploit. This is literally using the same payload loadiine.ovh uses to exploit your console online, so you should be getting close to a 100% success rate with this. It will be impossible for Nintendo to update your console, but you will obviously lose the ability to browse the eShop and play games online.
I have made a package for everyone to download that includes instructions on how to do everything. I've made it as simple and noob friendly as possible, though the guide assumes you have followed the "Kernel Exploit Prep Work: Setting up Your SD Card" guide from above. You can download the package below.
Note: This is a modified version of Kafluke's all-in-one package from GBATemp with incorporating Seita's idea to use Connectify in order to take your Wii U offline completely. Special thanks to Cybernatus (From GBATemp and loadiine.ovh) for making this payload public.
Download FlimFlam69's All-In-One Self-Hosting (Offline) Package 126mb v1.1
[Brazillian Title Install Method] [KE08]
This is an alternative to loadiine. In a nutshell, we will be installing any game of your choosing to the Wii U itself. This means that if you have an external USB HDD formatted to the Wii U's file format, then you will be able to install whatever game to that USB drive and run it. Going online with these titles will work, though at this point it's unclear if it's safe to do so.
--Disclaimer--
/r/WiiUHacks does not condone piracy. In this section I will be presenting tools that access Nintendo's servers to download titles in the desired format for this tutorial. This same method displayed can be used to download content illegally; which we are in no way responsible for your actions regardless of what you chose to do.
[Phase 1: uTikDownloadHelper] [KE09]
We will be grabbing the game of your choice from Nintendo directly in the format it needs to be in for this to work. Thanks to /u/DanTheMan827 for making uTikDownloadHelper!
Step 1) Download the latest uTikDownloadHelper.
Step 2) Create an empty directory/ folder. (This will be used to download the game.)
Step 3) Open 'uTikDownloadHelper.exe'. A window will pop up asking you a question, and you must answer it before uTikDownloadHelper will work.
Step 4) A list of games will be displayed. On the upper left hand corner, choose the region from the drop down box that matches your Wii U. The list of games will be filtered for that specific region.
Step 5) Select the game of your choice and click 'Download Selected'. It will ask you to choose a folder to download the game into. Find and select the folder we made back in Step 2.
NOTE: The directory/ folder you made in Step 2 must be empty. uTikDownloadHelper will tell you if the folder isn't empty and ask you to select another folder that is.
NOTE 2: The game you pick needs to have been released on the eShop, and also must have seen a retail (physical copy) release. For example, Call of Duty: Ghosts won't work because it has never been released on the eShop. Toki Tori 2 won't work because it only saw an eShop release. Splatoon will work because it saw a physical release and was digitally sold on the eShop.
Step 6) A command prompt window will pop up and begin to download your game. Depending on how big the game is, it might take a while. When it's completed the download, the window will disappear. You can now close uTikDownloadHelper.
We've now got the game in the correct format with the modified ticket to use later. You're ready for phase 2.
[Phase 2: Formatting the USB HDD] [KE10]
If you plan on installing your game onto a USB HDD, then follow these next few steps. We need to format the drive into the specific file system the Wii U wants it to be in.
NOTE: If you have a USB HDD you already use for Wii U games, than it's already in the correct format. You can skip ahead to phase 3.
NOTE 2: You cannot use the same USB HDD for Wii U and hacked vWii purposes. vWii asks for something like a FAT32 partition, when the Wii U wants to take over the whole HDD with it's own proprietary format. No kind of fancy partitioning will help.
NOTE 3: This process will erase all the contents of the HDD, and it will become unusable when plugged into a PC.
Step 1) Plug your USB HDD into a usb port while your Wii U is turned off.
NOTE: The Wii U can use external HDDs that are bigger than 2TBs, but can only utilize 2TBs of the HDD. For example, I'm using a 3TB external HDD - but the Wii U can only use 2TBs of the 3TBs.
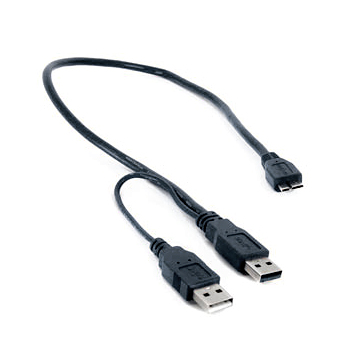
NOTE 2: If you're using an external HDD that does not have it's own power source, then you need a Y-cable. Plug both male ends into either the back or in the front two USB ports.
Step 2) Turn the Wii U on. You will be prompted to format the detected HDD. Do so now.
And that's it! Onto phase 3.
[Phase 3: Setting up the SD card and Installing our Game] [KE11]
I'm assuming you've already followed the 'Kernel Exploit Prep Work: Setting up Your SD Card' guide from above.
Step 1) Download the latest Modified WUP Installer
Step 2) Set things up in the SD card like this:
Step 3) Create a directory in the root of your SD card and call it 'install'
Step 4) Navigate to the folder/ directory we created in Phase 1, Step 2. Copy all of the contents from this folder into the 'install' folder we just created in the root of the SD card from Step 3.
Step 6) Put the SD card into the SD Card slot in your Wii U.
Step 7) Get into the homebrew launcher with your preferred method.
Step 8) Launch 'WUP Installer Mod'
Step 9) You'll see a black screen with white text. Pressing A will install your game onto the system memory, and pressing X will install your game to your USB HDD. Read the below note first, and then press one of those buttons depending on what you want to do.
Step 10) It'll tell you when it's done with the installation. When it is, press the home button. This will bring you back to the homebrew launcher. From here, get back to the Wii U main menu.
If everything went well, you'll see your new game installed on the menu ready to be played! You can make sure it installed into the correct directory by checking where it has installed in 'System Settings' under 'Data Management.'
[Additional Notes] [KE12]
These are things you cannot share on this subreddit, doing so will result in a ban, no exceptions
I get this error in WUP Installer: 0xFFFBF440. What does this mean?
The installation process failed without giving me a solid error
My external HDD is 4TBs and my Wii U says it only has 2TBs. What's going on?
Can I use the same Wii U formatted external HDD alongside my hacked vWii for USB Loader GX/ Nintendont/ etc?
When I enter a title key into UWizard before extracting a WUD, it says it's incorrect. What's going on?
I can't find a WUD file for [XXXXXX] game
Can I bring my saves over from Loadiine?
Can I update my games?
Can I hold you responsible if my Wii U bricks?
[Various Things] [KE13]
[nnupatcher: eShop Access with Dualhax/ Router URL Blocking] [KE14]
So, you're looking for eShop access with update blocking procedures on? That's why we have nnupatcher! (Thanks /u/supster131) I will be going through these steps assuming you have set your SD card up according to the guide above.
Step 1) Download the latest nnupatcher.
Step 2) Set things up in the SD card like this:
Step 3) Put the SD card back into the SD Card slot
Step 4) Get to the Homebrew Launcher using your preferred exploit method. (The Easy Way or The Self-Hosting Way)
Step 5) If you installed nnupatcher correctly, you'll see it pop up on the Homebrew Launcher on screen. Select it!
Step 6) It will bring you back into the Wii U system menu. Click the eShop icon.
Step 7) And presto, You're in!
[Saviine: Injecting Saves] [KE15]
You are reading this because you want to inject a loadiine save into a game playable via the Wii U main menu. Whether you actually bought the game, or installed it via the Brazilian method, this is what you want to be reading.
Step 1) Download, and extract the latest Saviine.
Step 2) Copy the 'wiiu' folder to the root of your SD card. When it comes to Saviine, Your apps folder should look like this:
Step 3) Run 'dump.bat' in the server folder where you extracted Saviine too. This will create a saviine_root folder. Close 'dump.bat'.
Step 4) In saviine_root, create a folder and call it, 'inject'.
Step 5) Copy the loadiine saves (you would like to inject) from this directory in the SD card:
Into the 'inject' folder we made in the last step, Step 4
Step 6) Rename the loadiine save folder, which looks like, 'Paper Mario Color Splash [XXXXXX]' to the games Title ID.
Step 7) There are 2 folders in this save folder. Rename them as such:
Step 8) Find your computer's IPv4 address. Remember this address. It should look like this: 192.168.X.XXX
Step 9) Run 'inject.bat' in the server folder where you extracted Saviine too.
Step 10) Put the SD card into the SD Card slot in your Wii U.
Step 11) Play the game you want to inject your save to until you can make a save.
Step 12) Get to the homebrew launcher through your preferred method and launch Saviine.
Step 13) Set your IPv4 address you found in Step 8.
Step 14) Press X to install Saviine and go back to the Wii U menu.
Step 15) Launch the game you want to inject the game save into.
Step 16) Look at your PC. The inject.bat that's been running since Step 9 should have given you a prompt with 2 drop down boxes. On the top drop down, select '80000001'. In the second drop down, select 'Inject.
Step 17) inject.bat should start working, and finish within 30 seconds. When the game starts: you'll see that the save injected successfully.
[Saviine: Dumping Saves] [KE16]
You are reading this because you want to dump a save from a title installed on the Wii U. You can either share this save online, or use it on a game loaded via loadiine.
Step 1) Download, and extract the latest Saviine.
Step 2) Copy the 'wiiu' folder to the root of your SD card. When it comes to Saviine, Your apps folder should look like this:
Step 3) Run 'dump.bat' in the server folder where you extracted Saviine too. This will create a saviine_root folder. Keep dump.bat running.
Step 4) Find your computer's IPv4 address. Remember this address. It should look like this: 192.168.X.XXX
Step 5) Put the SD card into the SD Card slot in your Wii U.
Step 6) Get to the homebrew launcher through your preferred method and launch Saviine.
Step 7) Set your IPv4 address you found in Step 4.
Step 8) Press X to install Saviine and go back to the Wii U menu.
Step 9) Launch the game you would like to dump the save from.
Step 10) Look at your PC. The dump.bat that's been running since Step 3 should have given you a prompt. Dump everything.
Step 11) dump.bat should start working, and finish within 30 seconds. When you look in the saviine_root folder, you'll see a folder called 'Dump'. Your save is in this folder labeled with the game's title ID.
[SD Card Mount Failed Error] [KE17]
If you keep getting this error, something is messed up in your SD card. I've found that, for whatever reason, it's because there is unallocated data before the FAT32 partition. Let me try to visualize it for you:
When the Wii U sees the unallocated data first, it refuses to look any farther than that. So how do we go about fixing this? To describe the process in a nutshell:
WARNING) If you're using the same SD card from your 3DS that uses emuNAND/ redNAND, the unallocated data is your emuNAND/ redNAND. If you are following this guide, YOU WILL delete your emuNAND/ redNAND. If you haven't hacked your 3DS and don't know what I'm taking about, this doesn't apply to you.
Step 1) You have to use something like Ease US Partition Manager. This will allow you to visualize whats going on in your SD card and make the necessary changes in formatting.
Step 2) Turn the unallocated data into something. Usually, it's only a couple of megabytes of data, so you have to format it into an NTFS, so it'll look like this:
Step 3) Delete the FAT32 partition:
Step 4) Resize the NTFS partition all the way to the right:
Step 5) Change the NTFS to a FAT32 and give it 64kb cluster allocation
Step 6) Apply changes. It might take a bit to finish these changes.
And that's the gist of it! This is just a quick write-up on how to generally fix the problem.
[Nintendo DS Virtual Console Injection] [KE18]
This method, as far as I know, ONLY applies to the DS.
Keep in mind that you will not be able to inject any DS roms over 64mbs. This is because there has been no game released for the DS VC (officially) that exceeds 64mbs in size (as of writing this). Also, you cannot inject a 64mb DS rom into a game for the DS VC that’s only 32mb in size.
Another thing: each DS VC release has a modified emulator by Nintendo specifically for that game. Keep in mind, injecting roms into different official VC releases will yield different results. If your desired game doesn’t work (properly) after injecting, try another DS VC Official release.
The GBATemp Wiki also has a compatibility list for DS injects that people have already tried, so see if the game you want to try is listed!
Step 1) Have a/ your desired DS VC base game already formatted for Loadiine. (Don’t ask me where to get one. Use Google, it shouldn’t be that hard to grab a base game.) I’m going to use ‘New Super Mario Bros’ as an example for the sake of this guide.
Step 2) Unzip the game (if necessary) and navigate to the following directory:
Step 3) Extract the only file in ‘rom.zip’. It should be a file called something like, ‘WUP-N-DADE.srl’.
Step 4) Copy only ‘WUP-N-DADE’ from the filename and delete both ‘WUP-N-DADE.srl’ and ‘rom.zip’.
Step 5) Drag your NDS rom into that folder. (In this example, mine is ‘Ace_Attorney.nds’)
Step 6) Rename your NDS rom to ‘WUP-N-DADE’ and change the file extension to ‘srl’. (So, ‘Ace_Attorney.nds’ becomes ‘WUP-N-DADE.srl’)
Step 7) Right click the new ‘WUP-N-DADE.srl’, go to ‘Send to’, then click ‘Compressed (zipped) folder’ to zip the file. Call it, ‘rom.zip’.
Step 8) Rename the game folder. (For example, New Super Mario Bros [GAMEID] would become Ace Attorney [GAMEID])
Step 9) Put it on your SD card, in the games directory:
Step 10) Run it in Loadiine! Everything should work (or at the very least, boot).
Step 11) Optional: If you would like to get fancy and edit the Icon/ Banner display in Loadiine (meta stuff) then you can edit them in the ‘…/Ace Attorney [GAMEID]/meta’ directory, with photoshop. The icon is called ‘iconTex.tga’ and the banner is ‘bootTvTex.tga’.
I’m sorry if any of this is unclear, I’ll give it another look as soon as I have the chance!
[NES & SNES Virtual Console Injection] [KE19]
/u/dubyadud has written a tutorial on making NES & SNES VC injections. Check it out here!
[Games Won't Show up in Loadiine] [KE20]
If a game is not showing up in Loadiine and it's definately on the SD card, double check these things:
Make sure you have the latest Loadiine GX2
Make sure your games are in SD:/wiiu/games/
Make sure your GAME IDs are correct. For example, a EU Pokken Tournament directory should look like this: SD:/wiiu/games/Pokken Tournament [APKP01]
If it's not one of these things, your game dump may be missing some vital files for Loadiine to recognize it as a game. Grab another dump and try again.
[Virtual Console Manual Crash Fix] [KE21]
This is a fix for the crash that happens when you exit the manual in a VC Inject game. It literally just breaks that function, so the manual will never initiate in the first place. All the credit goes to /u/zeron88 for this fix!
Instructions in his own words: "You have to put these 2 files into "SD:\wiiu\games\VC DS\content[numbers]\data\scripts" and overwrite the existing ones."
I've personally tested this fix, and it works flawlessly.
[Importing and Exporting DS Saves from VC] [KE22]
/u/zeron88 figured out a way to do what the title says. I've personally tested this method with Ace Attorney Investigations 2 with DeSmuMe and it worked for me! (As /u/zeron88 says in the original GBATemp thread, this method may need a little more testing.)
What this Tutorial is for
Importing saves to the VC
Exporting saves from the VC
[Frequently Asked Questions] [KE23]
I have a Wii U on X.X.X firmware. What can I/ should do with it?*
Update the Wii U to 5.5.1 if it isn't already. The eventual release of the IOSU exploit will be compatible with this firmware, and when Nintendo does release a new firmware - it might be tricky to get to 5.5.1 if you're on a lower firmware. Not a lot of retail discs are known to provide the specific 5.5.1 update, so update via Nintendo's official servers now while you can. If you don't believe me, check out these statements from WulfyStylez, (1) and shinyquagsire23 of Team SALT over on GBATemp.
What is Homebrew Launcher?
What is loadiine?
Can we use external USB Hard Drives to load backups?
When are we getting an IOSU exploit?
What kind of SD card can I use?
Can I play EU backups on US consoles and vice versa?
XXXXX game won't work/ run correctly in Loadiine. How do I make it work?
Can I play backups (games) online?
I keep seeing 'FSGetMountSource failed.' after I run the exploit. What went wrong?
Nintendo scheduled maintenance for this time. Does that mean we're getting an update?
My Wii U says it failed to download something/ a system update. Is there one out?
How do I mod Super Smash Bros. for Wii U?
How do I mod Splatoon?