Tech
With every new Mac and every new Mac OS X version, the Migration Assistant …
I got my first Mac, an iBook, in 2002. It ran Mac OS 10.2 Jaguar. Since then, I’ve migrated my electronic life to new hardware three times and to a new OS version four times. I’m sure the Migration Assistant can assist me in moving from my MacBook running 10.6 to a new MacBook Air running 10.7 without trouble. But after almost a decade, I’m ready to make a clean break and start from scratch, only migrating my data—no applications, libraries, or the cruft that has built up in nooks and crannies of the system.
Although all of this is inspired by the imminent arrival of Mac OS 10.7 Lion, the information here is not Lion-specific; I have tested the various migration tactics on Snow Leopard. However, most of them are more application- than OS-specific.
Why bother?
Migrating by hand is a lot of work and carries the risk of even more work down the road if something isn’t migrated properly and has to be restored from backups.
Some Ars staffers (who shall remain nameless) suggested that I should just clone my old drive to the new one and then run the Lion upgrade process. Disk cloning is a good way to get up and running again after replacing a hard drive, but it’s not a good idea if the new machine is released with a newer version of the OS. The new hardware might require drivers that the OS on the old system doesn’t have yet. If you want the least amount of trouble, the best migration strategy is to let the Mac OS installer or the Migration Assistant do their thing. This has worked extremely well for me for the past nine years.
So why attempt a manual migration at this point? Four reasons: applications, settings, bloated iLife libraries, and cruft left behind in the Library folder.
When I ran the System Profiler and looked at System/Applications to see the list of applications installed on my system, I was surprised at how many applications and tools had managed to snag a spot on my hard drive over the years. My system seems to be a Roach Motel for applications.
The applications in the list range from multiple copies of my scanner software to Yahoo Sync to various ancient Adobe tools to links to Windows applications on a non-existent Boot Camp partition installed by Parallels Desktop.
Some judicious uninstalling would help, or I could tell the Migration Assistant not to bring over applications. But that would still leave all kinds of settings and other application data hanging around in my Library folder.
Another reason to start from scratch is so all my settings are reset to the system defaults. For instance, when I wrote the iWork’09 review, I noticed that the applications had gained new icons in the toolbar. But because I had already customized the toolbar with an earlier version of each application, I never saw the new icons. I’m sure there are lots of examples of new or improved options in Mac OS that I’ve never noticed because the settings I’ve been using for years make them invisible. By not bringing over any of my existing settings, I get to experience the Mac the Way Steve Jobs Intended. (For a while, at least, until I turn off everything I find annoying.)
Then there are the iLife libraries. My iTunes and iPhoto libraries add up to 100GB of disk space, and especially in the case of iPhoto, I suspect that there’s a good amount of waste. iPhoto reports 44.4GB worth of photos, but the disk space taken up by the iPhoto library is 64.4GB. I really want to find out if the extra 20GB is legitimate overhead—iPhoto needs to store thumbnails and such—or cruft that has built up in nooks and crannies of my iPhoto library.
There’s also that other library: the Library folder in my home folder. It holds 11.8GB worth of data, including 6.8GB of mail. I’m sure some of that other 5GB has a legitimate purpose, but there’s also lots of settings and support data for defunct applications hanging around in there. Manually going over the 300,000 or so files doesn’t appeal to me; neither does leaving all these old settings intact. If I ever reinstall one of those applications, I want them to have that fresh app smell, not be hampered by settings left over from an older version.
So although there is no absolute need to start clean and bring over everything that needs to be brought over by hand, the reasons above are compelling to me at this point in time. A big reason for that is the fact that I’ve migrated my system at least seven times in nine years, and the confluence of a new Mac OS version and a new computer makes for the perfect opportunity to attempt such an undertaking. But I’m the first to agree that this is not for everyone.
The network
I don’t recommend doing a manual migration with the same machine as the source and the destination, because then you can’t have the old and the new system side by side. Everything will be harder to do (and riskier). Therefore, I’m assuming you have a new machine straight out of the box sitting next to an older one that has all your data and settings on it.
The first order of business is setting up some networking. The ideal situation is one where both machines are hooked up to your home network (and, through this, the Internet) using Ethernet. If your computers both have Ethernet ports, but you can’t connect them to your home network that way; you may want to turn off WiFi and connect the two computers using a direct cable when the time comes to copy over large amounts of data. Having both the direct cable and WiFi connected usually doesn’t work well because the data often still goes over the slower WiFi link. You only have to turn off WiFi on one of the computers to force transfers through the cable.
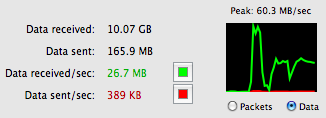
Gigabit Ethernet is fast!
You may also want to use a direct Ethernet cable if both machines have Gigabit Ethernet but your home network is limited to 100Mbps Ethernet. Direct connections require no setup; just plug in the cable and the machines should automatically “see” the services the other one is advertising. You should be able to turn the WiFi back on once the transfer is going without trouble.
If only one system has Ethernet, your fastest option is to connect that computer to a LAN port on your WiFi base station and use WiFi on the computer that doesn’t have Ethernet. That way, the WiFi base station can dedicate the full WiFi bandwidth towards the Ethernet-less computer rather than first receiving packets from one computer wirelessly and then sending them out to the other wirelessly, which effectively cuts the WiFi bandwidth in half.
In order to transfer data, you need to set up one computer for File Sharing in the Sharing section of the System Preferences. I prefer to let my secondary system do all the sharing, so if the unthinkable happens and someone gains access to the machine over the network, at least it’s not my main computer, where I do my online banking and so on, that’s compromised.
You can connect to the sharing computer’s drives from the other computer by simply clicking on its name in the sidebar of a Finder window and then clicking on “Connect As” to log in.
A new password
As long as we’re being paranoid, you may also want to pick a new password for your new account on your new computer at this time. Remember that advice on strong passwords typically applies to situations where offline password guessing is an issue. This is not the case for your account password as long as the guesser doesn’t have your Mac—or your backups!—in their possession, so you don’t necessarily need a password consisting of 14 or more completely random characters. That never hurts, though.
I personally use a password that has eight pretty random characters. As I have to type it several times a day, forgetting the password is not a (big) issue, but excessive length would be. I also wrote it down on something in a very safe place and don’t use it for anything other than my account on my Mac.
The keychain
In theory, you could start with a fresh new keychain and type in and save all your passwords for WiFi networks, websites, et cetera, as needed. In practice, this is a huge pain and there’s always a risk that you’ll forget some passwords and lose them. Keychain files typically don’t get very big (1.3MB on my system) so you could just copy your login keychain from your old system to your new system and not worry about stale data in there.
I use two keychains: the regular login keychain that the system creates and where all your saved passwords go by default, and a second “autolock” keychain, which I set up so it automatically locks after five minutes. Because the autolock keychain contains all my more sensitive passwords and secure notes, I feel comfortable not autolocking my login keychain so I don’t have to type my password 587 times a day. Both keychains do have the same password (my login password) so I don’t have to remember which password I have to type to unlock which keychain.
There’s also the system keychain (System.keychain in /Library/Keychains), which holds all your WiFi passwords as well as some certificates. It’s not clear to me what kind of password the system keychain uses, and it does contain some system stuff, so rather than copying over the system keychain, I think it’s better to copy the items in it that you need to another keychain before copying that keychain to the new computer (or recover the passwords in the system keychain through some other means). Remember that you can always double click on an item to reveal the password–yet another reason why you want to keep your old system around for a while.
A good way to migrate keychains is to start with new, fresh keychains but install the old one(s), too, using a different password (such as the login password on your old system, which your old login keychain already has by default). Then, when the system or an application needs a password, you get asked for your password to unlock the keychain that holds the password in question.
I’ve set up Keychain Access to put an icon in the menu bar through its preferences. The menu bar icon lets you call up the program and lock/unlock each individual keychain manually, as well as lock your screen with your login password.
You can find your login keychain in the Library/Keychains folder in your home folder. It’s best to put your old keychain(s) in Library/Keychains under your account on the new machine, renaming them to something like login-old.keychain. Then use File ? Add Keychain (not New Keychain!) in Keychain Access to add the old keychains to the system.
From that moment on, applications will find the passwords when they need them and you can also drag passwords and other keychain items from one keychain to another. However, this gets old fast as you need to enter your password for each one. I like to drag items to my new login, autolock or system keychains when an application or the system tries to access them. Eventually, only stale entries no longer in use remain in the “-old” keychains—I think I recently retired my original Tiger keychain.
Safari, Address Book, and iCal
Safari bookmarks, Address Book entries, and iCal events are items that MobileMe can sync to another computer or a mobile device. If you don’t use MobileMe, you’ll have to do this manually. This is easy enough because Safari lets you export and import bookmarks, and Address Book and iCal let you ex/import items as well as backup and restore their entire libraries. (All under the File menu.)
In the case of Address Book and iCal, the backup mechanism is the most useful, as it retains things like address groups and subscriptions to external calendars. The downside is that restoring a backup replaces all existing information in these programs. If you find that your Address Book backup is surprisingly large—mine was 28MB—that’s mostly due to photos attached to contacts, so use smaller ones if this bothers you. (When cropping a photo to be added to a contact inside Address Book, the part of the photo cropped away is still saved.)
For Safari, I didn’t even want to import my old bookmarks, which have been heavily infected with link rot. Upon casual observation, the exported bookmarks look like a simple HTML document, so I simply saved that file to my Documents folder as “10.6 Bookmarks” and then added it to my menu bar for easy access. The few I wanted to keep, I opened in background tabs with a command click and then added the contents of each of those tabs to the new Safari’s bookmarks.
In Library/Mail you can find several plist files that hold settings for things such as signatures and filter rules; you can copy those over if you want to avoid having to enter them from scratch.
If you have QuickTimeMPEG2.component installed in /System/Library/QuickTime, make sure to copy it over to your new system. Even though the codec itself is a universal binary, Apple’s installer uses PowerPC executables, so it won’t work under Lion.
I only use IMAP to get my mail, so all my mail will automatically be downloaded from the respective servers once I add my account details. If you use POP or have archived e-mail locally, you’ll want to transfer those messages by exporting them out of Mail using Archive Mailbox under the Mailbox menu. You can then import them on your new computer using Import Mailboxes (under File).
This is also a good time to think about moving some old e-mails to an archive rather than to keep them in Mail. Because Mail stores every e-mail as a separate file on disk (which is then indexed by Spotlight), there’s a lot of file system overhead. In an archive, on the other hand, all messages in a mailbox are kept in one big text file. So storing old mail in archival format saves a good amount of disk space. Bonus tip: Mail also lets you remove attachments from messages (under the Message menu), allowing you to save some disk space if the message is still important but the attachment isn’t.
Applications
If your new system has a regular magnetic HDD, it’s a good idea to install your applications before you transfer a lot of data. This way, the applications will be stored on the outer, faster part of the disk platters so they load faster.
Reinstalling applications downloaded from the Mac App Store couldn’t be easier: just open the app store, go to the Purchased tab and click the install buttons as desired. There’s no need to wait for one download to finish to initiate the next one.
You may want to make a list of non-App Store applications that you’ll have to reinstall. If you go to About This Mac under the Apple menu and then choose More Info, you will end up in the System Profiler, which has a nice big list of all the applications installed on the system (click Applications under Software in the sidebar).
It also tells you the kind of binary used by each app: Intel or Universal are OK, but PowerPC won’t work anymore under Lion, so you need to find a newer version or a replacement for those programs. In my case, I still had seven Classic applications on my system, all of which have been defunct for a long time. I guess I’ll have to face the fact that I’m never going to play “Oh No! More Lemmings” again.
This was the point in the process where I was glad I obsessively hoard the installer packages of downloaded applications—until I realized I had to check the websites to see if new versions have appeared, anyway. To get you started, here are some of my essentials: Chrome, Firefox, Skype, the more usable Skype 2.8, VLC, Perian, and Handbrake.
(Remember, if your new system is a MacBook Air and you have another system available that does have an optical drive—even if it’s a Windows system—you can use Remote Disc to install software from CD or DVD.)
If you bought any downloaded software, you’ll probably need to enter some serial numbers. Fortunately, most programs show you their serial number on the splash screen (take a screenshot with command-shift-3 if it’s too fast), in the About information (under the program name’s menu item) or in the Register menu item.
Data
Before I discuss the actual copying of the data, I must first talk about about when to do this. I use my old Mac for work every day. As long as my data is on the old system, I can continue to use that system for work without trouble, while I install applications and so on to the new system. But at some point, the new system will have to be the workhorse. This moment comes after I’ve copied over all my data and then modify any of it. At that point, you can’t go back to your old system (easily, at least), so choose an appropriate moment to make the conceptual switch from your old to your new system.
Copying over the data is as easy as connecting to the old computer over the network and dragging some folders from the old home folder to the new one. (Remember the direct cable/no WiFi trick discussed earlier.) Mostly, that is. If you try to drag, for instance, the Documents or Sites folders to your home folder on the new system, the system complains. (Perhaps this will be easier under Lion where folders can be merged.) In the meantime, I copied folders like Documents, Movies, Downloads, Desktop, and Sites to the desktop on the new machine, where I then moved the contents to their namesake folders at my leisure.
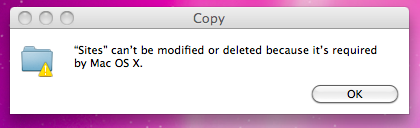
In the case of Pictures and Music, I also needed to avoid copying over the iTunes and iPhoto libraries, which are important enough to get some special treatment below.
I ran into a snag on some files with permissions set such that they couldn’t be copied. I didn’t want to skip those files or mass-modify permissions, so I decided to hunt down the offending files. This is a job best done through the Terminal:
cd find . ! -perm -0400 -ls | more
This should print a list of files in your home folder for which you don’t have read permission. Then type ‘open “<path>"‘ (include the double quotes but not the single ones) to open a Finder window. There, you can use Get Info to change the permissions of the offending files. (Or just use the chmod command as you’re already in the Terminal anyway.)
iTunes
Many people dislike iTunes, and not all of them are Windows users. I don’t get it, though. iTunes is wonderful, at least when compared to the pain and suffering that is iPhoto. But that’s for later.
With Home Sharing, iTunes lets you copy all types of data—music, videos, iOS applications, books, you name it—from one computer to another on the same local network. (You can even copy from one account to another on the same computer if you use Fast User Switching and let iTunes run under the other account in the background.) You do lose some metadata such as dates and play counts, but there are two more serious snags.
The first is that Home Sharing doesn’t copy over album art in all cases. If you buy songs from the iTunes Store or add album art to songs manually, the album art is embedded in the MP3 or AAC file. If you copy these files to another iTunes library, the album art shows up in iTunes without problems. But if you add album art using the “Get Album Artwork” function in iTunes, the images are stored in the iTunes library and not in the MP3 or AAC files. When transferring songs using Home Sharing (or any other method), this album art is lost.
To avoid such catastrophic results, I first did a test run copying the potentially affected songs from the old to the new computer. For this purpose, I created a smart playlist that only matches music with album art on the old computer. Then, I transferred all the songs in that playlist to the new computer using Home Sharing. On the new computer, I made a smart playlist that matches all music that doesn’t have album art.
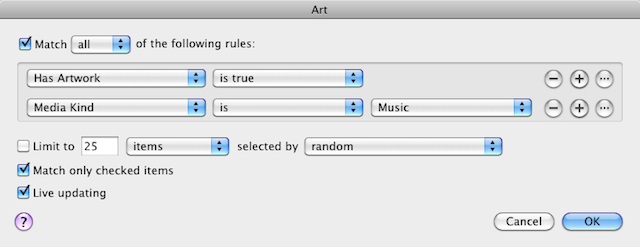
An iTunes smart playlist that matches music with album art.
I then exported that playlist as an XML file (File ? Library ? Export Playlist) and imported that playlist in iTunes on the old computer. For each song, I did a Get Info and cut and then pasted the artwork. This writes the artwork image into the song file.
Following the above procedure, I was ready to copy over my entire library, after first removing all the earlier imported songs from the new computer. I didn’t want to lose my star ratings, so I made smart playlists for each of zero to five stars on both the old and the new systems. Then I imported all the songs in the five star playlist on the old system. On the new system, all these songs had lost their stars, so they were in the zero stars playlist. There, I selected the entire playlist and rated all songs with five stars. Rinse and repeat for the other star playlists.
If you want to keep your old playlists, you can export those individually as XML files and import them on your new Mac. Or simply export the entire iTunes library as an XML file and import that; this will bring back all your playlists in one go.
iTunes-iPhone syncing
The problem with creating a brand new iTunes library out of thin air is that now your iPhones, iPads, and iPods won’t sync with your new computer without first wiping them completely clean. For stored media that isn’t such a big deal, as it will be copied back afterwards. But it does mean you lose all your application data, such as your highly valuable Angry Birds scores.
If you read this blog entry and some of the older ones it links to, you’ll find advice on how to work around this. For reasons too boring to explain, my results were inconclusive: it seemed to work, but I could be wrong.
I was pleasantly surprised that my 36.94GB iTunes library on the old computer was 36.66GB on the new one—a difference of less than one percent. So, I think I’m simply going to copy over my existing iTunes library this time around to avoid having to set up my iPhone from scratch. Hopefully this will no longer be an issue once iCloud materializes, and maybe I’ll hand-migrate my iTunes library at that point.
My nemesis: iPhoto
So far, my effort to migrate without assistance has gone pretty smoothly—only some secondary metadata gets lost when manually bringing over iTunes content. Things are very, very different with iPhoto. First of all, the program is really slow. I have about 26,500 photos, and that’s a lot. iPhoto has to show thumbnails as you work with the program; I can see how it would be a bit slower than iTunes, even though the two programs basically do the same thing: manage a library.
But iPhoto is not just a little slower than iTunes. It’s unbearably, glacially, mind-numbingly slow. When you create a new album, the album inherits all the photos that are in the current view. If that happens to be the “Photos” view, that’s all 26,500 of them. Removing them from the newly created album takes 1,069 seconds. That’s right, nearly 18 minutes of 100 percent CPU utilization—on a system with two cores. Come on, Apple.
But that’s not the actual problem. The real problem is that iPhoto lets you add a huge amount of metadata, such as locations, faces, and keywords. But there is no way to get photos out of iPhoto without losing that metadata. Well, there is one trick: you can burn photos to DVD. If you do that, the metadata is written to DVD just fine; iPhoto just removes it when copying photos from such a DVD back into your new library. To add insult to injury, iPhoto even makes JPEGs out of raw images if you do that. Same thing if you import photos through the sharing feature.
However, if you export photos as files and choose “original,” raw images are exported as raw images, and they’re also imported as such. For photos that have no metadata beyond what’s stored in their EXIF tags, this works very well because iPhoto will “see” a file’s creation date and time, GPS information, and camera settings.
However, PNG and some other file types don’t support EXIF and I have a bunch of photos from back before I had a Mac which don’t have EXIF information. Maybe the camera I had then didn’t support EXIF, or the Windows program I used to copy the images over to my computer removed the tags. These files do have something resembling a correct timestamp in my current iPhoto library, but none of export/import options retain that timestamp.
Fortunately, there’s a solution for this. iPhoto lets you “Adjust Date and Time” (under the Photos menu). If you then select “Modify original files,” an EXIF tag with the new creation date is written into the file and the file can be imported with its creation time intact. I created a “smart album” that matches all unknown camera models and changed all the photo timestamps to one second later.
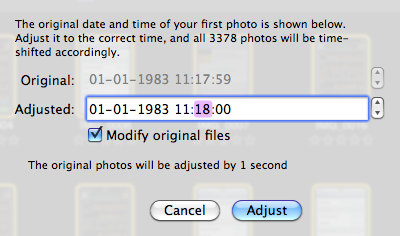
It turns out there is a way to seed a new iPhoto library with photos that have all metadata, including the adjustments made to exposure, color saturation, etc. The way to do this is by burning photos to DVD, then copying the “iPhoto Library” folder on the DVD to the Pictures folder. When you start iPhoto, it rebuilds the thumbnails and has a brand new library containing all the previously burned photos with full metadata. The problem is that this only works to seed a new library, you can’t use this trick to add additional images to a new library. But it was still useful to get 2GB or so—much more won’t fit because of iPhoto’s overhead—of my metadata-heaviest photos to the new system.
I then created a smart album that matched all my edited photos. Turns out all photos taken before August 2007 that were rotated because they were taken in portrait orientation were considered “edited” by iPhoto. Apparently, in iPhoto versions prior to 7, rotating a photo meant creating a new version of the photo, while also keeping the original. For good measure, the new version typically has an least a 50 percent larger file size, too. So I selected all those photos and chose “Revert to Original” from the Photos menu, with the plan to rotate them using the current, non-destructive rotate function. But of course, when the photos reverted to their original version, they were no longer considered edited so I couldn’t select them in order to rotate them anymore. Copy these photos to a non-smart album for safe-keeping first.
With the number of edited photos reduced to a hundred or so, I created a non-smart album where I also manually added photos for which I had set the GPS coordinates by hand, as well as any non-JPEG photos (match filenames ending in .png, .gif, and so on). I burned these to DVD and used them to seed my new library. Then I made a bunch of smart folders, one for 19xx and ones for all the years starting with 2000 that match any photos that aren’t in my “burn” album. I exported the photos in each album as original files to a separate folder on a USB drive. Finally, I imported each of those folders into my new library. (Importing all 26,500 photos at once made iPhoto hang.)
The result was a library with at least some important metadata in it. All movies in my original library were missing, but I think I’ll just manage those outside iPhoto from now on anyway. However, unless the next version of iPhoto is much better, I’m going to look for an alternative, because it’s obvious that iPhoto suffers strong non-linear performance reductions as the number of photos in its library increases. But for now, I have a fresh new library. My original library contains 44.4GB worth of photos but takes up 64.4GB of disk space. For the new one, it’s “only” 58.2GB. It’s not really the reduction I was hoping for, especially considering the effort involved.
Life without Flash
The idea behind this project was to leave behind the old and embrace the new. Because of this, I’m also looking at all my applications and plugins with a critical eye.
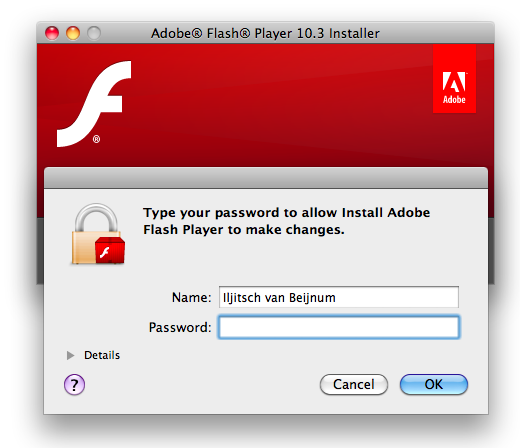
Although I can’t find anything to support it, everybody seems to be assuming that there will be no Adobe Flash installed as part of Lion. Or maybe that’s just a MacBook Air thing. In any event, Adobe has some of the worst installers in the business. The new Flash installer isn’t that bad, but it still asks for your administrator password. I really, really, really hate that, and I don’t want to submit myself to a steady regime of installing Flash updates the hard way. (Why can’t Apple and Adobe get together and distribute Flash through the Mac App Store?)
Apart from animated ads that I’m not going to miss, the main source of Flash for me is YouTube. You can opt in to YouTube’s HTML5 video player and then most YouTube videos work without Flash. Or, for a much nicer player, install the Safari extension YouTube5, which also handles Vimeo and Facebook videos.
I plan on using Google Chrome to view the remaining pages that need Flash; Chrome comes with its own copy of the Flash player which is updated automatically. Annoyingly, many sites serve up Flashless content just fine if you visit them using an iPhone or iPad, but only show you a “you need Flash” banner if you use Safari on the Mac.
Not for the faint of heart
It feels good to leave a decade’s worth of stale application settings and other cruft behind. However, there’s still that nagging feeling that I forgot to copy over an important file and that I’m going to regret all of this as soon as my old system and all of my backups go up in flames though some freak accident. I’m certainly not going to do all of this for every new release of the OS—this new, fresh system should be able to handle the upgrades to 10.8 and 10.9, and who knows what will happen after that.
I can only recommend this procedure to those who feel comfortable diving into obscure corners of their Mac’s file system and can afford to spend at least a week migrating their data by hand. You have to enjoy tinkering with your system at least a little, or it’s going to be a frustrating experience. But as long as you haven’t made changes to your data on the new machine, you can always wipe the system (or just your account) and use the Migration Assistant after all.
It’s also been an interesting experience interacting with a clean, uncustomized version of Mac OS 10.6. Before this, I only had a partial view of Apple’s intentions with each update because of all my own settings and customizations. I’m looking forward to experiencing Lion the way Apple intends it to be experienced for a while, then striking a new balance between taking the system as it comes and applying my own customizations.
I’m ready for my Lion now.

Iljitsch is a contributing writer at Ars Technica, where he contributes articles about network protocols as well as Apple topics. He is currently finishing his Ph.D work at the telematics department at Universidad Carlos III de Madrid (UC3M) in Spain.