Biz & IT
Arcade cabinets, robots, wearable computers and more built by Pi hobbyists.
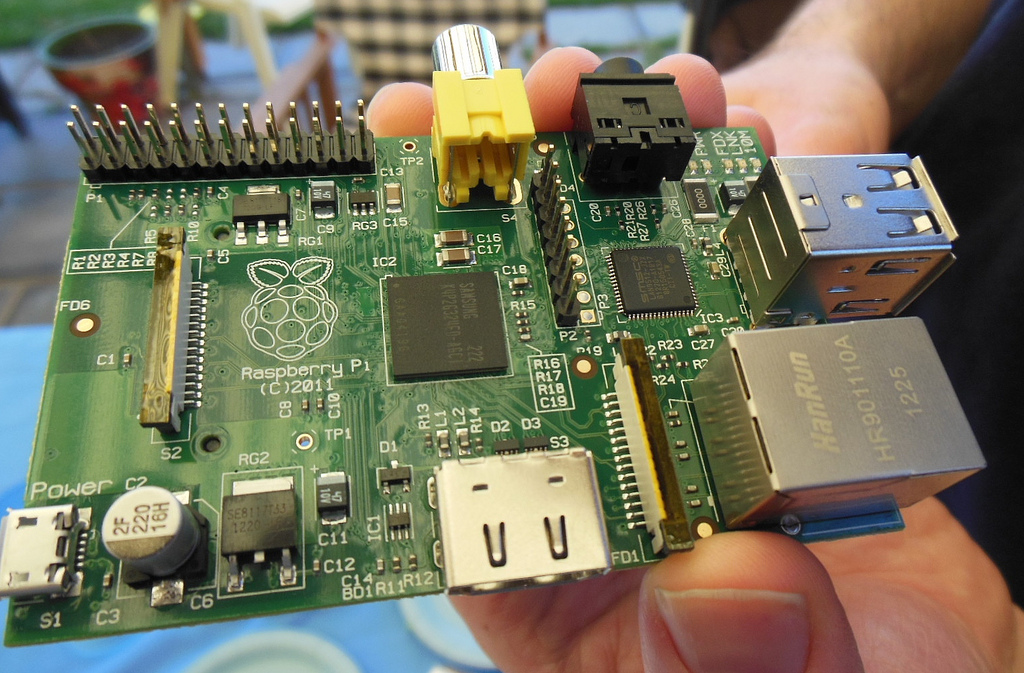
The Raspberry Pi, the $35 credit card-sized computer, has lived an interesting life despite being less than a year old. It has been used to teach programming and host servers, but above all it has provided a near-perfect platform for some of the most fun and interesting hobbyist projects in the computing world.
Arcade cabinets, computing clusters housed in LEGOs, musical instruments, robots, and wearable computers are just some of the uses Pi owners have found. It turns out you can do a lot with an ARM processor, GPU, a few ports and GPIO pins, and an operating system (typically Linux-based) loaded onto an SD card. Here are 10 of the coolest Raspberry Pi creations we’ve been able to find.
A Pi-powered arcade cabinet
Lots of people have installed gaming emulators on the Raspberry Pi—not as many have used it to build an entire arcade cabinet. One such brave soul named Darren J described his epic MAME project in a guest post on the official Raspberry Pi blog last month.
The Raspberry Pi arcade cabinet running Track and Field.
Darren loaded the MAME (Multiple Arcade Machine Emulator) software onto a Raspberry Pi inside a coin-operated JAMMA cabinet. It wasn’t easy. Darren had to replace the monitor and power supply unit (PSU), and get the inputs connecting the buttons and joysticks to the Pi working properly. For that, he got an I-PAC 2, a PC interface that supports 32 button and joystick inputs.
“I hadn’t seen any information on anyone using one with a Pi, but as it supposedly appeared as a standard USB keyboard to the host system, I thought it was worth a try,” Darren wrote. “In addition, having screw terminals would make connecting all the buttons a breeze—it was a simple case of finding a pinout of the JAMMA edge connector and attaching the cables one at a time. With the addition of a powered USB hub, it was time to see if the Pi worked with the iPac 2. I needn’t have worried, it worked without any issues at all.”
Darren and buddies played Track and Field on the cabinet, before he sold it on eBay for £258. The lucky winning bidder received a functioning game machine with two joysticks, three buttons per player, and two start buttons. It has a working coin mechanism, although it’s not the cabinet of choice if you’re looking to play every arcade game in existence.
“At present the range of games the Pi can play is limited—some need emulation that’s just beyond it and the sound is usually the first indicator that things are not going to go well, but for vintage games it’s working well, and is exactly what I planned for—no hard drives to worry about, and much lighter than a fragile PC,” Darren wrote.
When Darren showed the finished cabinet to a friend, “he couldn’t believe such a small machine is capable of running the system at all, let alone as well as it does.”
Looking for more Raspberry Pi arcade awesomeness? Check out this guy who built a fully functioning arcade cabinet so small it fits in the palm of your hand:
Smaller than a Game Boy.
And as we’ve written previously, a successfully funded Kickstarter project aims to ship arcade cabinets for the Raspberry Pi in kit form starting in February.
Raspberry Pi in the sky: Sending images from near space
One of Dave Akerman’s hobbies is High Altitude Ballooning (HAB), which he explains involves the use of “standard weather balloons to put small payloads typically 100g-1kg into ‘near space’ at altitudes of around 30km or so, carrying a tracking device (so the balloon position is known throughout the flight) and usually some sensors (temperature, pressure etc) and often a video or stills camera storing to an SD card for later retrieval.”
But why bother with “later retrieval” when you can send live images down to Earth during flight? That’s what Akerman was able to do after buying a Raspberry Pi. “In almost all of my previous flights I used Arduino Mini Pro boards, and these are ideal—tiny, weigh almost nothing, simple and need very little power,” the UK-based Akerman wrote in July. “I looked at the Pi and saw none of these desirable features! What I did see though was a USB port offering quick, easy and inexpensive access to a webcam, meaning that for the first time I could have live images (SSDV) sent down by my payload—something that hasn’t been done very often.”

The Raspberry Pi’s view from near space. Credit: Dave Akerman
Akerman added heat sinks to protect the Pi, a Radiometrix NTX2 radio transmitter, GPS receiver, and a webcam, among other things. “The radio system has low bandwidth and with a typical flight lasting 2 hours or so we don’t have time to send large images, so there’s no point using the very best webcam and the highest resolution,” Akerman wrote. “I settled on 432 x 240 pixels with 50% compression as a good compromise between quality and download speed. I measured the webcam current and it went from 50mA at idle to 250mA peak when taking a picture, hence the need to short out the USB fuse (140mA max). A simple shell script took a photo every 30 seconds, saving them on the SD card so that the tracker program could choose the ‘best’ image (largest jpeg!) for transmission.”
The project went off pretty much without a hitch, and the Raspberry Pi was recovered intact.
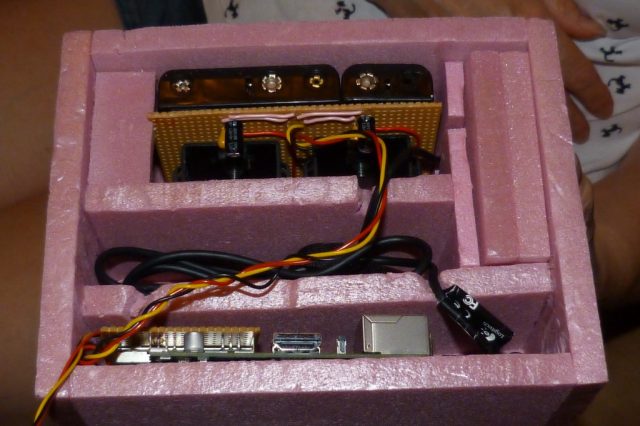
Container with Pi, webcam, GPS, batteries, and other equipment. Credit: Dave Akerman
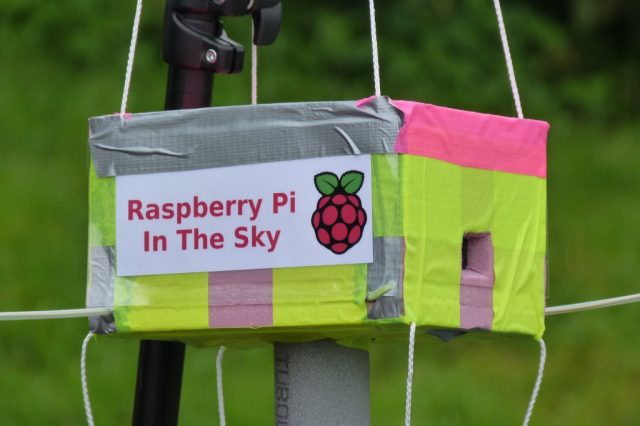
Payload attached to the balloon. Credit: Dave Akerman

Mission control. Credit: Dave Akerman
Siri, open the garage door
Apple’s Siri technology is designed for people to give orders to their phones. But it can also control additional devices with Siri Proxy, a proxy server that connects to the Siri service.
One enterprising Pi user revealed this month that he’s using Siri to open and close his garage door, thanks to a Raspberry Pi hooked up to an automatic garage door system:
Yes, Siri is a man in the UK.
“This is my first real Raspberry Pi project—Siri Proxy running on the Raspberry Pi, along with wiringPi to access the Pi’s GPIO pins and turn a relay on/off,” a user calling himself “DarkTherapy” wrote in the Raspberry Pi forums. “The relay is then hooked up to my automatic garage door system. So, I have control of the door with Siri on my iPhone.”
The system is set up to work only over Wi-Fi, but he says it “would be possible to use this over cellular with a VPN.” After installing Siri Proxy and wiringPi, he modified the code in one of the example Ruby scripts that comes with Siri Proxy to include commands specific to his garage door setup.
Here’s the code he used:
listen_for /open the garage door/i do
  say "Opening the garage door.."
  request_completed
  system("gpio mode 1 out")
  system("gpio write 1 1")
  system("sleep 0.5")
  system("gpio write 1 0")
end

listen_for /close the garage door/i do
  say "Closing the garage door.."
  request_completed
  system("gpio mode 1 out")
  system("gpio write 1 1")
  system("sleep 0.5")
  system("gpio write 1 0")
end
That type of script can be modified to control all sorts of devices. “As you can see, the ruby script is basically calling ‘system’ commands to access wiringPi,” DarkTherapy wrote. “Setting a GPIO pin as an output then setting it high for half a second then low again. You can have Siri call any command you can type in a terminal window, such as a passwordless SSH login to a remote pc to have it shut down or rebooted.”
For more home automation fun, check out these projects for controlling a coffee machine, creating an e-mail notifier light, a sunrise/sunset timer for Christmas lights, and a Pi-powered alarm system.
64 Raspberry Pis form an HPC Lego cluster
Professor Simon Cox of the University of Southampton and his 6-year-old son James built a “supercomputer” containing 64 Raspberry Pis housed inside Legos, all connected via Ethernet switches. A message passing interface allows the processors to talk to each other, and divide up tasks.
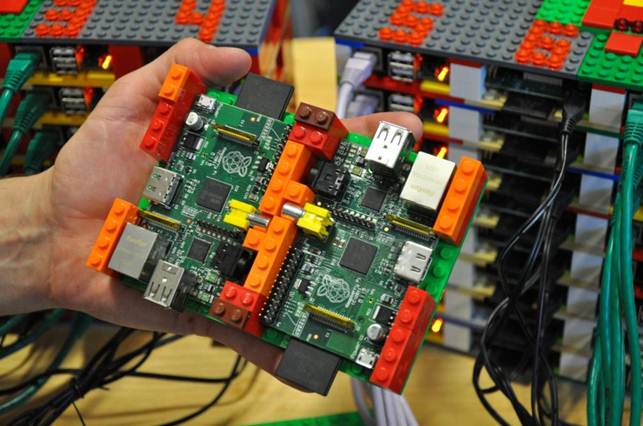
We already wrote about this project back in September, so to see how it’s progressing these days we got an update from Cox via e-mail. Cox is working on a research paper to provide a detailed analysis of performance. Early results “show that the system scales well up to 50-60 processors to give an almost linear performance boost as more processors are added, but beyond that the results will become more dependent on the network switch,” he said. That means building the Lego cluster up any more won’t provide a huge performance boost because “we opted for readily available off-the-shelf ethernet switches rather than anything too pricy.”
The entire cluster uses 192 watts, and has remained on continuously for months. The system has been “remarkably stable” with zero node failures, with Cox noting that “it is always important to shut down a Raspberry Pi cleanly with ‘sudo poweroff’—early on we sometimes corrupted a memory card when we just power cycled.”
The cluster has proven to be an excellent teaching aid and resource for projects. As great as Legos are, Cox is “developing casing and housing for the system using our 3D printing facilities and some volunteers working on CAD projects.”
Cox recently posted this video, in which he says “Lego is a very convenient way for us to put everything together,” and makes it easy to test out different designs. Each Pi provides about the equivalent of a 300MHz Pentium 2 processor, with a GPU capable of 24 gigaflops, he said. While it doesn’t compare to the university’s full-sized supercomputers, it is sufficient to “show the basic principles of supercomputing.”
Simon Cox discusses the Raspberry Pi Lego cluster.
The BeetBox: A musical instrument consisting of a Raspberry Pi and beets

This is probably one of the strangest creations to come from Raspberry Pi enthusiasts—but also one of the most fun and entertaining. Scott Garner, a Masters student at New York University who calls himself “basically unemployable in a conventional sense,” used the Raspberry Pi to create a “simple instrument that allows users to play drum beats by touching actual beets.”
Garner crafted a wood enclosure that holds the Raspberry Pi, capacitive touch sensor, and a speaker.
Touch sensing is handled by an MPR121 Capacitive Touch Sensor from SparkFun, for which I ported existing Arduino code to Python. This board communicates with a Python script on a Raspberry Pi via I2C. The script watches for new touches and triggers drum samples using pygame. Audio from the Pi’s line out is run through a small amplifier I built using an LM386, which is based on a circuit straight from the data sheet. The amp is connected to a salvaged speaker mounted under the holes in the lid.
Video on Garner’s blog shows a series of “performers” laying down some beats on the “BeetBox.” Check it out:
Beetboxing.
Anonymous surfing: A Raspberry Pi Tor node

The Tor network helps Internet users living in repressive regimes stay online during government crackdowns, and can be used by anyone concerned about privacy to anonymize their Web browsing. It does this by randomly directing Internet traffic through a worldwide network of servers, each one hosted by a volunteer.
Various do-gooders have installed the Tor relay onto their computers to expand the network’s presence. At least a few Raspberry Pi owners have used the tiny computer for that same purpose. “As the Tor network is not a commercial organisation, it requires voluntary supporters,” one blogger who installed Tor on a Pi notes.
Tor is available for Raspbian, a Debian-based OS optimized for the Raspberry Pi, and can be installed from the command line with sudo apt-get install tor.
In addition to that, there is a decent amount of network configuration required to get Tor running on the Raspberry PI. Instructables has a tutorial that will take you through the necessary steps.
Turning the Pi into a Super Nintendo—with a real SNES controller
Super Pi
Gamers have gravitated to the Pi, as we saw with the Pi-powered arcade cabinet, there’s an app store with some games, and even Minecraft is on its way to the little computer. But for some more retro gaming action we turn to PetRockBlog founder Florian, who turned the Pi into a Super Nintendo complete with an adapter allowing use of a real SNES controller.
“To make the controller connector, he used a SNES-adapter PCB, two SNES connectors, two shrouded pin headers (2 x 3 pins), two ribbon crimp connectors (2 x 3 pins), one 6-wire ribbon cable, one 26-wire ribbon cable, and one ribbon crimp connector (2 x 13 pins),” Tom’s Hardware explained back in July. Florian noted that “A short C program reads the states of the two controllers and passes all button presses to a virtual keyboard that is implemented with the help of the input module.”
In the video above, Florian had Super Mario Kart running, but without sound. Other modders have made further progress on the Super Nintendo idea since, including one who mounted a Pi inside an old Super Nintendo console:
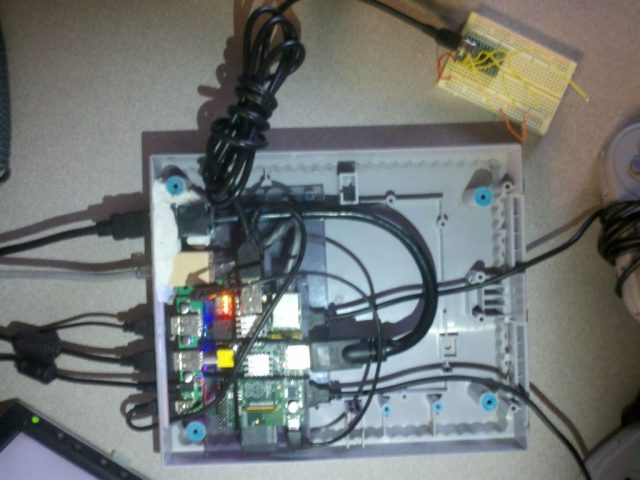
That’s a Raspberry Pi inside a Super Nintendo. Credit: MIDItheKID
“The power button switch turns the system on and off, and the reset switch is wired up to a Teensy (http://www.pjrc.com/teensy/) which acts as a one-button keyboard,” MIDItheKID, who built the system, wrote. “When the reset switch is pressed, it exits the emulator and goes back to the EmulationStation game selector (so the ROM gets dumped with the save files still in tact). The entire system is operable without a keyboard or mouse.”
it plays Super Nintendo and Nintendo Entertainment System games—audio does work, but not all the time. Here’s a video of two people playing Zombies Ate My Neighbors on the Super Pi:
Building a Raspberry Pi laptop
Typically, Raspberry Pi users looking to use the little board as a conventional desktop hook it up to a TV or monitor and connect a mouse and keyboard. Some, though, have gone to the extreme effort of turning the Raspberry Pi into a functioning laptop.
The failure of the Motorola Atrix—a phone that comes with a lapdock—has been a boon to this effort. Now that the device has been discontinued, the lapdock is easy to find for $50 to $75. It’s designed to be hooked up to the phone with Micro USB and Micro HDMI ports, but can connect to a Raspberry Pi instead.
The Pi rests outside the laptop, so it’s not fully self-contained, but is rather portable. A Pi owner named Drew Fustini got it working, as you can see here:
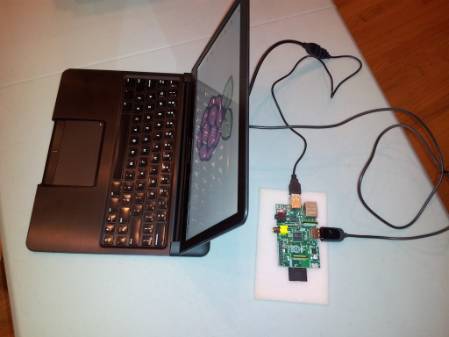
Originally, this setup required splicing cables together. Becky Stern of DIY company Adafruit helped make this easier by posting a video tutorial:
Raspberry Pi laptop with Atrix 4G Dock
However, Fustini says that’s no longer necessary on newer models of the Pi. “The USB cabling described in the above blog and video is only needed for Raspberry Pi’s that have F1/F2 polyfuses,” he writes. “‘Fresher’ Pi’s now have either 0-ohm resistors on F1/F2 (Model B Revision 1.0 + ECN0001) or no F1/F2 pads at all (Model B Revision 2.0). … With those polyfuses gone, the Pi can be powered via it’s USB host ports as an alternative to the micro USB jack. This is great for the Atrix lapdock as it was designed to both power the Atrix phone and connect it to USB devices over the same connected. This means that no USB cable modifications are needed at all.”
For something a little less portable, check out how this Pi owner used a briefcase to build a “pretty functional mobile PC, featuring WiFi, Bluetooth, a keyboard, touchpad, display, and batteries,” as Liliputing reports:
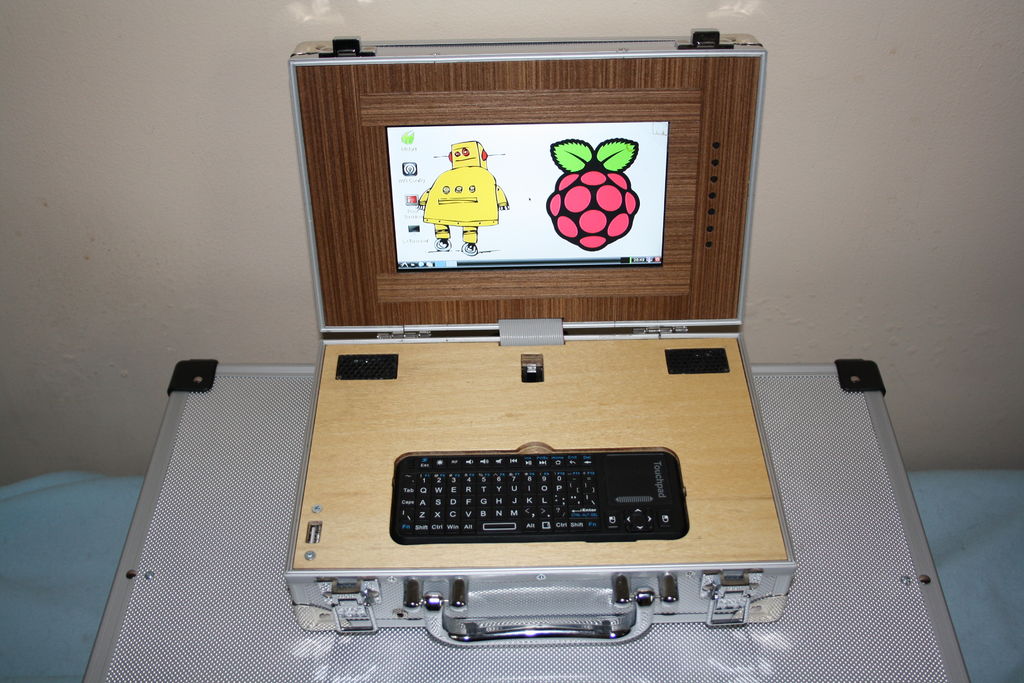
LapPi: A Raspberry Pi Netbook
LapPi: A Raspberry Pi Netbook Credit: SilverJimny
A Roomba robot
There was less than a zero percent chance that Pi enthusiasts wouldn’t try to build robots. Sadly, we haven’t seen anyone recreate the Daleks, Cybermen, or Rosie the robot maid just yet. But a few have built working robots, including this one using a repurposed Roomba.
The Roomba uses the Pi as its “brain,” and thanks to a Python script can be controlled by a Nintendo Wii remote, Roomba robot creator Ben J. wrote in a guest blog on the official Raspberry Pi site. “I’ve always had a big interest in robotics and electronics in general, so when I heard about the Raspberry Pi, I knew I had to build a robot around it,” he wrote.
Driving a Roomba with a Wii controller.
Ben removed the Roomba’s cleaning brushes, and got the Pi connected to the Roomba’s transistors and a power source.
I considered using a relay board to control the two drive motors from the GPIO. However, it turns that all the good boards were a little too expensive for a hobby project, so I decided to open the Roomba up and see if I could somehow control the motors from the existing circuitry. Guess what? It turns out that there are four small transistors on the main board that power four larger transistors that deliver power to the motors. This means that there are two transistors per motor: one for forwards and one for backwards.
Once I had confirmed the location of the transistors I needed on the board, I connected their bases to GPIO pins 4, 17, 18 and 21 on the Raspberry Pi with with a 16 pin socket that I had lying around.
To power the Raspberry Pi, I soldered together a power supply circuit around a 1 amp 5 volt regulator (basically the regulator and two capacitors) on a piece of perf board and had the 5v output from the regulator run to a micro USB connector. I also added some miscellaneous components to the circuit, like a power switch, a 2.5 Amp fuse, a 12 volt in socket and some 12 volt out sockets; one of which the camera is plugged into. The roomba’s main board is also plugged into a 12 volt out socket.
For good measure, the Roomba has a camera and can shoot video from its own perspective. If you’re looking for some more Pi/robot goodness, check out this little remote-controlled car using a Raspberry Pi and an Xbox 360 controller.
Who needs Google Glasses? Here’s a wearable Pi PC
It doesn’t look as hip as Google’s augmented reality glasses that won’t land in consumers’ hands until 2014, but with a Raspberry Pi and a little knowhow you can have a computer on your face today.
Zack Freedman built a wearable Raspberry Pi, with the display on a pair of glasses and a keyboard on his arm, Nintendo Power Glove-style:

Yep. It’s just as awesome as it looks.
Yep. It’s just as awesome as it looks. Credit: Zack Freedman

The full contraption.
The full contraption. Credit: Zack Freedman.
Freedman built it with parts he just happened to have nearby, since his main area of expertise is wearable computing. It was very much an impromptu sort of thing: “When Rob Bishop of the Raspberry Pi Foundation visited the space [the Hoboken Makerbar] yesterday, he challenged the attendees to build a project using the tiny open-source computer,” Freedman wrote. “I decided, why not take advantage of its small size to make myself a cyborg? Wearable technology is my main area of hacking, so I had some parts lying around.”
Besides the Pi, Freedman used the insides of the MyVu Crystal video glasses (originally built for the iPod) and coupled it with a Duracell phone recharger, mini keyboard and trackpad, and video cable. “Apart from the video cable, the system is totally wireless!” he wrote. “I zip-tied the RasPi to my belt and the keyboard to my wrist. Everything is wearable with zip ties!”
A similar setup would cost about $100, and could connect to the Internet with a Wi-Fi USB adapter.
A delicious, Pi-filled future
You may (correctly) argue that many of these projects could have worked just as well or better with a more traditional computer, but then again traditional computers typically can’t be bought for $35 plus taxes and shipping. The Raspberry Pi’s creation was all about providing a low-cost platform for teaching computing concepts and allowing hackers to build to their hearts’ content, and it’s done just that.
“Developing countries are interested in the Raspberry Pi as productivity devices in areas that simply can’t afford the power and hardware needed to run a traditional desktop PC; hospitals and museums have contacted us to find out about using the Raspberry Pi to drive display devices,” the Raspberry Pi Foundation says. “Parents of severely disabled kids have talked to us about monitoring and accessibility applications; and there seem to be a million and one people out there with hot soldering irons who want to make a robot.”
What else is in the works? At least one hobbyist is attempting to build an in-car PC. The future is a Pi-filled one, and we can’t wait to see what happens next.
Listing image by Trevor Johnson.

Jon is a Senior IT Reporter for Ars Technica. He covers the telecom industry, Federal Communications Commission rulemakings, broadband consumer affairs, court cases, and government regulation of the tech industry.