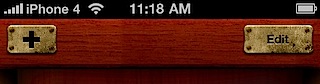
I have an upcoming iPhone application, Cartographer, that is highly stylised and requires high customisation of the interface to achieve a convincing, beautiful vintage look. To make it work, I needed transparent toolbars and navigation bars for my UIViewController-based views.
The solution I came up with for this was to implement a category on UINavigationBar and UIToolbar, and overriding drawRect: with a method that does absolutely nothing. Then I can place my own textures behind the bar, and they’ll be seen, instead of the default bar background.
@interface UINavigationBar (TransparentAdditions)
@end
@implementation UINavigationBar (TransparentAdditions)
- (void)drawRect:(CGRect)rect {
    // Do nothing!
}
@end
For UIToolBar, if you’re using it within a UINavigationController, you’ll want to also override drawLayer:inContext:, as this appears to be used instead of drawRect: when used within a navigation controller, for some weird reason.
Note that this method will affect all bars in your app. If you only want some bars to be transparent, you’ll need to do a little objc-hocus-pocus. Thanks to Mike Ash for this solution on method replacement (read that article for the whys and hows). This technique replaces the default methods as before, but keeps track of the defaults. If you now set the tintColor of the bar to [UIColor clearColor], the bar will have a transparent background. Otherwise, it’ll just look the same as usual.
For UIToolbar (same principle for UINavigationBar):
#import

// Keep track of default implementation
static void (*_origDrawRect)(id, SEL, CGRect);
static void (*_origDrawLayerInContext)(id, SEL, CALayer*, CGContextRef);

// Override for drawRect:
static void OverrideDrawRect(UIToolbar *self, SEL _cmd, CGRect r) {
    if ( [[self tintColor] isEqual:[UIColor clearColor]] ) {
        // Do nothing
    } else {
        // Call default method
        _origDrawRect(self, _cmd, r);
    }
}

// Override for drawLayer:inContext:
static void OverrideDrawLayerInContext(UIToolbar *self, SEL _cmd, CALayer *layer, CGContextRef context) {
    if ( [[self tintColor] isEqual:[UIColor clearColor]] ) {
        // Do nothing
    } else {
        // Call default method
        _origDrawLayerInContext(self, _cmd, layer, context);
    }
}


@implementation UIToolbar (TransparentAdditions)

+ (void)load {
    // Replace methods, keeping originals
    Method origMethod = class_getInstanceMethod(self, @selector(drawRect:));
    _origDrawRect = (void *)method_getImplementation(origMethod);

    if(!class_addMethod(self, @selector(drawRect:), (IMP)OverrideDrawRect, method_getTypeEncoding(origMethod)))
        method_setImplementation(origMethod, (IMP)OverrideDrawRect);

    origMethod = class_getInstanceMethod(self, @selector(drawLayer:inContext:));
    _origDrawLayerInContext = (void *)method_getImplementation(origMethod);

    if(!class_addMethod(self, @selector(drawLayer:inContext:), (IMP)OverrideDrawLayerInContext, method_getTypeEncoding(origMethod)))
        method_setImplementation(origMethod, (IMP)OverrideDrawLayerInContext);
}

@end
You can now add background texture to the bars in a number of ways. These are two I’ve used:
- By adding a CALayer to
[bar layer]— but note that UINavigationBar will try to add elements at index 0, underneath your background. To make this work, I provided a subclassed CALayer (and overrode UINavigationBar’s+layermethod) which only lets you insert layers at index 0, via a custom method, and overrideinsertLayer:atIndex:method, setting index to 1 if it’s 0. UIToolbar doesn’t require this. - Or, by adding a CALayer to your view layer. Note that the view’s bounds do not cover the UINavigationBar; I had to offset the layer by the height of the bar in question (
navigationBarLayer.frame = CGRectMake(0, -self.navigationController.navigationBar.frame.size.height, [barImage size].width, [barImage size].height);, for example), and setself.view.clipsToBounds = NOto allow the layer to be seen.
Of course, you can also draw the texture in drawRect:, instead. It’s entirely up to you. The advantage in using a CALayer is that it can overlap the view boundary, for effects like drop shadows.
One Comment
Pingback: Transparente UINavigationBar - versatilemind.com
ArtOflex
September 23, 2010 at 6:27 am
Awesome, I search a technique to customize the buttons and UINavigationBar but in vain ! I’m newbies in Objective-C and XCode, could you please provide me a source code of this technique ?
If you want I am a GUI designer, we could share our knowledge?
October 13, 2010 at 8:03 am
Is this allowed in the App Store?
October 13, 2010 at 1:14 pm
I can’t imagine why not – it doesn’t use any private libraries, so it should be perfectly legal
Matthew
October 11, 2011 at 9:36 pm
This used to work xcode in 4.1 but in xcode 4.2, it doesnt make it transparent anymore. Any ideas?
@interface UIToolbar (TransparentAdditions)@end
@implementation UIToolbar (TransparentAdditions)
(void)OverrideDrawRect:(CGRect)rect {
// Do nothing!
}
(void)OverrideDrawLayer:(CALayer *)layer inContext:(CGContextRef)ctx {
// Do nothing
}
October 12, 2011 at 12:34 pm
I noticed that, too, but haven’t had time to look into it yet. I’d love to hear if you find a solution. I’ll update this post if I find it first, though.
Thomas
October 30, 2011 at 7:00 am
It seems that the condition in
if(!class_addMethod(self, @selector(drawLayer:inContext:), (IMP)OverrideDrawLayerInContext, method_getTypeEncoding(origMethod)))method_setImplementation(origMethod, (IMP)OverrideDrawLayerInContext);
evaluates to false, so
OverrideDrawLayerInContextnever gets called.ArtOflex
October 23, 2010 at 4:57 am
how did you create your buttons like the picture please?
October 23, 2010 at 4:01 pm
That’s a UIButton within a UIBarButtonItem
yama
January 18, 2011 at 9:24 am
Can you please elaborate your answer? Actually I need to implement something like this only. So was in need of some solutions.
Can you tell me,how to add toolbar item at the bottom line in the uitoolbar and not in the middle?
seary
November 9, 2010 at 8:35 am
thank you so much~~
Andy
December 13, 2010 at 12:22 pm
Method swizzling on UIKit classes (or any class you don’t own the implementation of ) is highly, strongly, extremely discouraged. Not by me – by ex-Apple luminaries such as Matt Drance and Evan Doll. You app WILL break with new versions of the OS.
December 13, 2010 at 2:11 pm
It certainly doesn’t seem like something one should typically do – but is there any realistic alternative? Aside from writing our own UIKit, that is ;-)
Robert
July 15, 2011 at 10:01 pm
Why not use inheritance to override the methods you want to replace on these classes? Replacing these methods with categories or method swizzling seems pretty dangerous and unnecessary…
July 15, 2011 at 10:14 pm
Hi Robert,
I’m afraid this is stretching my memory, now, but I do remember there were several issues with subclassing instead that turned out to be insurmountable. One of them was that there’s no way to provide UINavigationController with a custom UINavigationBar aside from within Interface Builder, and I’m not sure there’s any way to provide a custom UIToolBar. There were some more problems, but I can’t for the life of me remember what they were – I really should’ve documented them here, but I didn’t. Bad me.
Still, if you do (or have done) this successfully, I’d love to hear it.
Dave
September 16, 2011 at 9:42 pm
Very nice example how to legally change framework defaults. I guess this would be the way to turn off default Google Maps in MapKit and replace it with OSM. the question is how much time this would take to correclty find out how :) thanks for inspiration. Do you turn off Google Maps in Cartographer when you use OSM ?
September 16, 2011 at 9:46 pm
Hi Dave,
Actually, no, this approach would not work with something as complex as changing MapKit tile sources (essentially reimplementing MapKit). The Cartographer (and, as far as I know, most any other app that uses alternative tile sources) uses the Route Me library.
Dave
September 16, 2011 at 11:01 pm
thanks,but route me can’t use goole maps legally, right?
September 17, 2011 at 9:37 am
That’s right, yep
Dave
September 16, 2011 at 11:04 pm
in mapkit there is just mktilemap view with draw as well,
i am able to switch off base maps using undocumenetd func.
Thomas
October 30, 2011 at 7:27 am
In iOS 5 Apple introduced some methods to customize the toolbar, in particular
[toolbar setBackgroundImage:[[[UIImage alloc]init]autorelease] forToolbarPosition:UIToolbarPositionAny barMetrics:UIBarMetricsDefault];does the trick.November 4, 2011 at 5:48 pm
Cheers, Thomas – this is definitely the best solution. When used in conjunction with the method mentioned on this page (with a check for iOS version), it works great for both 5.0 and pre-5.0.
Sonny Parlin
November 7, 2011 at 10:35 pm
Can you tell me what the correct image resolutions are for navigation bar backgrounds? I’ve found the resoutions for pretty much all the other elements on Apple’s Custom Icon and Image Creation Guidelines page, but I couldn’t seem to find anything for pixel sizes on navigation bar background images.
November 8, 2011 at 3:46 pm
http://lmgtfy.com?q=uinavigationbar%20dimensions ;-)
December 11, 2011 at 1:57 am
Thanks for the thorough article. I’m using this technique now, but you mentioned that one of the advantages of adding CALayer to the view layer is that you can apply drop shadows. This is true, but I find that on scrollable views, what’s supposed to be the nav bar layer actually scrolls with the rest of the view. How do you handle that?
December 11, 2011 at 12:44 pm
That’s odd, Daniel – are you sure you’re adding the CALayer as a sublayer of the navigation bar’s layer? It’ll only scroll with the scroll view if it’s a subview of the scroll view, which it shouldn’t be.
December 11, 2011 at 3:23 pm
I added it to the view’s layer so I could apply a nice drop shadow gradient underneath. The controller’s view is actually a UITableView, so I was able to override layoutSubviews and use CATransaction to keep the background at the top. Sweet solution for what I’m up to. Thanks for the tips,
enrico
December 14, 2011 at 1:24 pm
form what I understood it’s highly discouraged to act like this because at run time you are not sure about which method is called.
A part of this thanks for the article, I’m trying to do pretty much the same thing. I need to animate my UINavigationBar between two colors, I thought the best way is to work with CALayer animation but I can get it done.
Good article anyway a bit complex but interesting way of doing this, did your application never crash?
greetings
Comments are closed.